
|
JTF > Tutorial > Graphical User Interfaces |
One of the most exciting things about coding in Java is that the standard libraries include a large number of tools for creating applications with sophisticated graphical user interfaces, usually referred to as
To make it possible for students to create simple GUI applications with a minimum of conceptual overhead, the acm.program package makes it easy to add Java interactors along the borders of any Program subclass. The usual approach is to pick one of the borders and add several interactors there, creating a control strip that allows the user to control the operation of the program.
As an example, suppose that you want to write a program that displays two buttons—Start and Stop—at the bottom of a program window. Let’s ignore for the moment what those buttons actually do and concentrate instead on how to make them appear. If you use the standard layout management tools provided by the Program class, all you have to do is include the following code as part of the init method:
|
The constant SOUTH indicates the bottom of the window and represents one of four border regions that are automatically created as part of the initialization of any Program subclass. Those four regions are the ones defined in the standard BorderLayout class and are arranged like this:

Each border region is initially empty. Empty regions take up no space, so that a particular region does not actually appear until you add an interactor or some other Java component to it. The NORTH and SOUTH regions arrange the interactors horizontally; the WEST and EAST regions arrange them vertically.
Creating the buttons, however, accomplishes only part of the task. To make the buttons active, you need to give each one an action listener so that pressing the button performs the appropriate action. These days, the most common programming style among experienced Java programmers is to assign an individual action listener to each button in the form of an anonymous inner class. Suppose, for example, that you want the Start and Stop buttons to invoke methods called startAction and stopAction, respectively. You could do so by changing the initialization code as follows:
|
Although there are instructors who favor this style even at the level of introductory courses, the members of the Java Task Force remain concerned that this coding style introduces too many unfamiliar concepts for novice programmers to comprehend. To simplify the structure and eliminate the use of inner classes, the Task Force chose to designate the Program class as an ActionListener. Adopting this strategy means that the initialization of the buttons can be shortened to
|
When using the program as an action listener, every button in the application triggers the same actionPerformed method, which must now look at the event to determine what button triggered the action. One approach is to call e.getActionCommand() method, which returns an “action command” string that, by default, is the label that appears on the button. This strategy is illustrated in the following actionPerformed implementation:
|
An alternative strategy would be to call e.getSource() to obtain the identity of the button that triggered the event. That strategy, however, would be useful only if you had chosen to store the button objects in instance variables so that you could compare them against the source of the event.
As a further simplification, the Program class includes an addActionListeners method that recursively traverses the components displayed on the screen and adds the program as an action listener for every JButton it encounters. This style means that the initialization of the buttons can be shortened even more dramatically so that the code requires only the following lines:
|
As an illustration of how to place interactors along the program border, take a look at the StoplightConsole program in Figure 4-1. This program creates three buttons—Green, Yellow, and Red—and places them along the bottom of a console window. In this version of the program, pressing a button simply prints out the label of the button. For example, pressing the three buttons in order from left to right would generate the following output on the display:
 |
Figure 4-1. Code for the console-based stoplight
/*
 * File: StoplightConsole.java
 * ---------------------------
 * This program illustrates the construction of a simple GUI.
 */

import acm.program.*;
import java.awt.event.*;
import javax.swing.*;

/**
 * This class displays three buttons at the south edge of the window.
 * The name of the button is echoed on the console each time a button
 * is pressed.
 */

public class StoplightConsole extends ConsoleProgram {

/** Initialize the GUI */
   public void init() {
      add(new JButton("Green"), SOUTH);
      add(new JButton("Yellow"), SOUTH);
      add(new JButton("Red"), SOUTH);
      addActionListeners();
   }

/** Listen for a button action */
   public void actionPerformed(ActionEvent e) {
      println(e.getActionCommand());
   }

} |
Although it is perfectly fine as an illustration of how to create a control strip along the bottom edge of the program window, the StoplightConsole program isn’t particularly exciting as an application, largely because it is console based. The ability to place interactors around the border of a program is even more equally useful with the other Program subclasses. The code in Figures 4-2 and 4-3 shows a similar application redesigned as a GraphicsProgram in which the stoplight is represented graphically on the display, like this:
 |
The Stoplight class shown in Figure 4-3 extends GCompound to create an object that responds to the messages setState(color) and advance().
Figure 4-2. A GraphicsProgram version of a stoplight [applet]
/*
 * File: StoplightGraphics.java
 * ----------------------------
 * This program illustrates the construction of a simple GUI using a
 * GraphicsProgram as the main class.
 */

import acm.graphics.*;
import acm.program.*;
import java.awt.*;
import java.awt.event.*;
import javax.swing.*;

/**
 * This class displays four buttons at the south edge of the window.
 * Pressing a button lights the indicated lamp in the stoplight or
 * advances the stoplight to its next configuration.
 */

public class StoplightGraphics extends GraphicsProgram {

/** Initialize the buttons and create the stoplight */
   public void init() {
      add(new JButton("Green"), SOUTH);
      add(new JButton("Yellow"), SOUTH);
      add(new JButton("Red"), SOUTH);
      add(new JButton("Advance"), SOUTH);
      signal = new Stoplight();
      add(signal, getWidth() / 2, getHeight() / 2);
      addActionListeners();
   }

/** Listen for a button action */
   public void actionPerformed(ActionEvent e) {
      String command = e.getActionCommand();
      if (command.equals("Advance")) {
         signal.advance();
      } else if (command.equals("Red")) {
         signal.setState(Stoplight.RED);
      } else if (command.equals("Yellow")) {
         signal.setState(Stoplight.YELLOW);
      } else if (command.equals("Green")) {
         signal.setState(Stoplight.GREEN);
      }
   }

/* Private instance variables */

   private Stoplight signal;

}
|
Figure 4-3. Graphical implementation of the Stoplight class
/*
 * File: Stoplight.java
 * --------------------
 * This class implements a stoplight as a compound graphical object.
 */

import acm.graphics.*;
import acm.util.*;
import java.awt.*;

/**
 * This class represents a graphical stoplight with its origin point
 * at the center.  The Stoplight class exports the following methods:
 *
 * <ul>-->
 * <li>-->getState()      - Returns the current state of the Stoplight
 * <li>-->setState(color) - Sets the Stoplight to the specified state
 * <li>-->advance()       - Advances the Stoplight to the next state
 * </ul>-->
 */

public class Stoplight extends GCompound {

/* Public constants for the colors */
   public static final Color RED = Color.RED;
   public static final Color YELLOW = Color.YELLOW;
   public static final Color GREEN = Color.GREEN;

/** Creates a new Stoplight object, which is initially red */
   public Stoplight() {
      GRect frame = new GRect(STOPLIGHT_WIDTH, STOPLIGHT_HEIGHT);
      frame.setFilled(true);
      frame.setColor(Color.DARK_GRAY);
      add(frame, -STOPLIGHT_WIDTH / 2, -STOPLIGHT_HEIGHT / 2);
      redLamp = createLamp(0, -STOPLIGHT_HEIGHT / 4);
      yellowLamp = createLamp(0, 0);
      greenLamp = createLamp(0, STOPLIGHT_HEIGHT / 4);
      add(redLamp);
      add(yellowLamp);
      add(greenLamp);
      setState(RED);
   }

/** Changes the state of the stoplight to the indicated color */
   public void setState(Color color) {
      state = color;
      redLamp.setColor((state == RED) ? RED : Color.GRAY);
      yellowLamp.setColor((state == YELLOW) ? YELLOW : Color.GRAY);
      greenLamp.setColor((state == GREEN) ? GREEN : Color.GRAY);
   }

/** Returns the current state of the stoplight */
   public Color getState() {
      return state;
   }

/** Advances the stoplight to the next state */
   public void advance() {
      if (state == RED) {
         setState(GREEN);
      } else if (state == YELLOW) {
         setState(RED);
      } else if (state == GREEN) {
         setState(YELLOW);
      } else {
         throw new ErrorException("Illegal stoplight state");
      }
   }

/* Creates a new GOval to represent one of the three lamps */
   private GOval createLamp(double x, double y) {
      GOval lamp = new GOval(x - LAMP_RADIUS, y - LAMP_RADIUS,
                             2 * LAMP_RADIUS, 2 * LAMP_RADIUS);
      lamp.setFilled(true);
      return lamp;
   }

/* Private constants */
   private static final double STOPLIGHT_WIDTH = 50;
   private static final double STOPLIGHT_HEIGHT = 100;
   private static final double LAMP_RADIUS = 10;

/* Private instance variables */
   private Color state;
   private GOval redLamp;
   private GOval yellowLamp;
   private GOval greenLamp;

}
|
The interactors that you can place in the border regions are by no means limited to the JButton class used in the preceding examples. The javax.swing package includes a variety of useful interactor classes including JCheckBox, JComboBox, JLabel, JScrollBar, JRadioButton, JSlider, JSpinner, JToggleButton, JTextField. None of these interactors are particularly hard to use, and the Java Task Force did not feel there was any need to extend the set of interactors except in one respect. Unfortunately, none of the existing classes is suitable for reading numeric data from the user. If students are required to use JTextField exclusively and perform their own numeric conversion, they must first master such difficult conceptual issues as the use of wrapper classes for numeric types and the details of exception handling. Hiding that complexity simplifies such operations considerably.
To this end, the Task Force decided to add two new classes—IntField and DoubleField—to simplify the development of applications that require numeric input. Each of these classes extends JTextField but provides additional methods to hide the complexity involved in numeric conversion and exception handling. The most useful methods available for DoubleField appear in Figure 4-4; the methods for IntField are the same except for the expected changes in the argument and result types.
Figure 4-4. Methods defined in the DoubleField class
| ||||||||||||||||||
The format control methods at the end of Figure 4-4 turn out to be relatively important. In the absence of format control, the value of a DoubleField often displays so many digits that the number becomes unreadable. The setFormat and getFormat methods eliminate this problem by allowing you to specify the output format. The format itself is specified using a string as defined in the DecimalFormat class in java.text. The use of format codes is illustrated in the currency converter program shown in Figure 4-8 later in this chapter.
One of the most common uses of interactors in the border region is to control the state of an animation running in the primary window. The Java Task Force packages provides excellent support for this type of animation control through the Animator class in the acm.util package. At one level, the Animator class is simply an extension of Thread, so you can use it as the thread of control for an animation as described in section 3.1. The Animator class, however, exports several methods that are useful for writing simple animation code. These methods are listed in Figure 4-5.
Figure 4-5. Useful methods defined in the Animator class
| |||||||||||||||||||||||||
These methods are most easily illustrated by example. For the last several years, the Computer Science Advanced Placement course has used a marine biology simulation as its case study. In that simulation, different species of fish inhabit an environment and evolve by breeding, moving, and dying as specified by various parameters of the simulation. A sample run of the applet version of the Marine Biology Simulation appears in Figure 4-6, which shows both the random initial state of a simulation and a control panel at the bottom of the window. The Start button starts the simulation, the Step button advances it a single step, the Stop button stops it, and the Reset button creates a new initial state. The slider at the right of the control bar sets the speed.
Figure 4-6. Initial state of the Marine Biology Simulation [applet]
 |
In the AP version of the case study, the details of the control panel are hidden from the student. When this example is recoded using the JTF tools, the code to create the control panel becomes quite short:
|
The code to handle the action events is equally manageable:
|
The code in the simulator class—which is stored in the instance variable theSimulation in the above code fragments—is also straightforward. This class is a subclass of Animator and includes a run method with the following form:
|
This simplification should make it possible for students to see the code for the entire simulation, and possibly to write more of it themselves.
As it happens, the biggest problems that students have in creating GUI-based applications don’t come from the design of the Swing interactor classes themselves but rather from the problems involved in arranging those interactors inside a window. Java’s traditional approach is to use a layout manager, which is responsible for managing the arrangement of the components within a JPanel or other form of container. Layout managers, however, can be difficult to teach. If nothing else, they introduce yet another source of complexity into programs that already seem to push the limits of student comprehension. The more serious problem, however, is that the existing layout managers do not strike the right balance for teaching. On the one hand, simple layout managers like FlowLayout and BorderLayout are easy to learn, but do not provide enough flexibility to design many common layout configurations. On the other, “industrial strength” layout managers like GridBagLayout have all the power you might want, but are extremely hard for beginners to learn.
To address this problem, the Java Task Force developed the TableLayout class, which allows you to arrange components in a two-dimensional grid. The TableLayout class is a layout manager that has all the capabilities of Java’s GridBagLayout manager, but is much easier to use.
The easiest way to understand how the TableLayout class works is to look at some simple examples. The basic structure of a TableLayout application is illustrated in Figure 4-7, which implements a simple temperature converter.
Figure 4-7. Temperature conversion program [applet]
/*
 * File: TemperatureConverter.java
 * -------------------------------
 * This program allows users to convert temperatures
 * back and forth from Fahrenheit to Celsius.
 */

import acm.gui.*;
import acm.program.*;
import java.awt.event.*;
import javax.swing.*;

/** This class implements a temperature converter. */
public class TemperatureConverter extends Program {

/** Initialize the graphical user interface */
   public void init() {
      setLayout(new TableLayout(2, 3));
      fahrenheitField = new IntField(32);
      fahrenheitField.setActionCommand("F -> C");
      fahrenheitField.addActionListener(this);
      celsiusField = new IntField(0);
      celsiusField.setActionCommand("C -> F");
      celsiusField.addActionListener(this);
      add(new JLabel("Degrees Fahrenheit"));
      add(fahrenheitField);
      add(new JButton("F -> C"));
      add(new JLabel("Degrees Celsius"));
      add(celsiusField);
      add(new JButton("C -> F"));
      addActionListeners();
   }

/** Listen for a button action */
   public void actionPerformed(ActionEvent e) {
      String cmd = e.getActionCommand();
      if (cmd.equals("F -> C")) {
         int f = fahrenheitField.getValue();
         int c = (int) Math.round((5.0 / 9.0) * (f - 32));
         celsiusField.setValue(c);
      } else if (cmd.equals("C -> F")) {
         int c = celsiusField.getValue();
         int f = (int) Math.round((9.0 / 5.0) * c + 32);
         fahrenheitField.setValue(f);
      }
   }

/* Private instance variables */
   private IntField fahrenheitField;
   private IntField celsiusField;
}
|
The user interface for the TemperatureConverter program looks like this:

The TemperatureConverter program provides a convenient template for creating GUI-based applications using TableLayout. The general strategy is to create a new class that extends the basic Program class and then define an init method that assembles the interactors into the desired arrangement. The first line of the init method is usually a call to setLayout, which creates the layout manager and assigns it to the program window. For TableLayout applications, the call to setLayout is simply
|
where rows and columns are integers indicating the dimensions of the table. For example, to create a 2 x 3 table (two rows running horizontally and three columns running vertically), you would write
|
You can also use 0 in place of the number of rows or the number of columns to indicate an unbounded value. For example, the call
|
indicates a table with seven columns and as many rows as needed to display the components in the table. That layout will form the basis for a calendar application in section 4.6.
Once the layout manager is in place, the rest of the init method then creates the necessary interactors and adds them to the table, filling each row from left to right and then each row from top to bottom. In the TemperatureConverter example, the calls to add create the Fahrenheit row of the table using the lines
|
and the corresponding Celsius row using the lines
|
If you look at the sample run diagram that this code produces, you will quickly see that the sizes of the various interactors in the table have been adjusted according to their preferred sizes and the constraints imposed by the grid. The JLabel objects are of different sizes, but the implementation of TableLayout makes sure that there is enough space in the first column to hold the longer of the two labels. By default, each component added to a TableLayout container is expanded to fill its grid cell.
The code for the TemperatureConverter example calls the addActionListeners method to designate the program as an action listener for all buttons within it. This strategy of using addActionListeners was described in the preceding chapter. This style gives rise to relatively compact programs that introductory students find easy to understand, but you could just as well use any of the other styles of event detection described in section 3.3.
The calls to addActionListener and setActionCommand make it possible for the user to trigger a conversion either by hitting the appropriate button or by hitting the Enter key in the interactor itself. Each of these actions generates an ActionEvent whose action command is either the string "F -> C" or "C -> F" depending on which button or interactor generated the event. These events are fielded by the actionPerformed method in the class, which performs the necessary conversion and then updates the value of the corresponding field.
The code for the CurrencyConverter program in Figure 4-8 implements a simple GUI-based program for converting currencies. When it first comes up on the screen, the application looks like this:
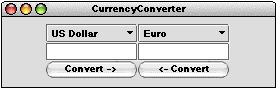 |
Figure 4-8. Currency conversion program [applet]
/*
 * File: CurrencyConverter.java
 * ----------------------------
 * This program implements a simple currency converter.
 */

import acm.gui.*;
import acm.program.*;
import java.awt.event.*;
import javax.swing.*;

public class CurrencyConverter extends Program {

/** Initialize the graphical user interface */
   public void init() {
      setLayout(new TableLayout(3, 2));
      currencyTable = new CurrencyTable();
      leftChooser = new JComboBox(currencyTable.getCurrencyNames());
      leftChooser.setSelectedItem("US Dollar");
      rightChooser = new JComboBox(currencyTable.getCurrencyNames());
      rightChooser.setSelectedItem("Euro");
      leftField = new DoubleField();
      leftField.setFormat("0.00");
      leftField.setActionCommand("Convert ->");
      leftField.addActionListener(this);
      rightField = new DoubleField();
      rightField.setFormat("0.00");
      rightField.setActionCommand("<- Convert");
      rightField.addActionListener(this);
      add(leftChooser);
      add(rightChooser);
      add(leftField);
      add(rightField);
      add(new JButton("Convert ->"));
      add(new JButton("<- Convert"));
      addActionListeners();
   }

/** Listen for a button action */
   public void actionPerformed(ActionEvent e) {
      String cmd = e.getActionCommand();
      if (cmd.equals("Convert ->")) {
         double fromValue = leftField.getValue();
         double fromRate = getRateFromChooser(leftChooser);
         double toRate = getRateFromChooser(rightChooser);
         double toValue = fromValue * fromRate / toRate;
         rightField.setValue(toValue);
      } else if (cmd.equals("<- Convert")) {
         double fromValue = rightField.getValue();
         double fromRate = getRateFromChooser(rightChooser);
         double toRate = getRateFromChooser(leftChooser);
         double toValue = fromValue * fromRate / toRate;
         leftField.setValue(toValue);
      }
   }

/* Gets a rate from the specified chooser */
   private double getRateFromChooser(JComboBox chooser) {
      String currencyName = (String) chooser.getSelectedItem();
      return currencyTable.getExchangeRate(currencyName);
   }

/* Private instance variables */
   private CurrencyTable currencyTable;
   private JComboBox leftChooser;
   private JComboBox rightChooser;
   private DoubleField leftField;
   private DoubleField rightField;
}
|
The interactors at the top are instances of the Swing JComboBox class, which makes it possible to choose an item from a list. If, for example, someone wanted to convert from U.S. dollars to British pounds, that user could click on the right JComboBox and then use the mouse to select the appropriate entry, as follows:
 |
The user could then enter a currency amount into either of the two numeric entry boxes and hit the corresponding conversion button. If, for example, the user entered 1000 in the left entry area and then hit the button below it, the program would compute the corresponding number of pounds and display the result like this:
 |
The user interface code for the CurrencyConverter program is quite similar to that used in TemperatureConverter, but there are a couple of interesting new features:
The CurrencyConverter program depends on a class called CurrencyTable that encapsulates the information about exchange rates. The CurrencyTable class exports two methods. The first is
|
which returns an array of the defined currency names. This list is used to create the array of options for the two JComboBox choosers. The second is
|
which returns a conversion rate for the specified currency. The implementation on the web site simply provides historical exchange rate values for a small sampling of currencies. A more ambitious implementation could go out to the web and find the current rates.
Although the ability to assign components to table cells is useful in its own right, you will soon discover that you often want to exercise more fine-grained control over the formatting of tables. One of the strengths of Java’s GridBagLayout class is that it offers considerable flexibility in terms of specifying the format of a table. Unfortunately, GridBagLayout exposes that complexity from the very beginning, which means that novices are quickly overwhelmed by the mass of details. The TableLayout class, by contrast, offers the same flexibility, but in a way that hides the details unless you actually need them. Using TableLayout makes it possible for students to learn the simple features of the model quickly but still have access to the more advanced features later on.
The most important factor in terms of simplifying the conceptual model is that TableLayout allows you to specify constraints for each cell using strings instead of a GridBagConstraints structure. When you add a component to a TableLayout grid, you can specify a constraint string that has the following form:
|
where constraint is the name of one of the GridBagConstraints fields and value is a value appropriate for that field. For example, to duplicate the effect of setting the gridwidth field of a constraints object to 2 (thereby specifying a two-column entry), adopters of the acm.gui package can simply specify the constraint string
|
As an example, you could use this feature to add a notice to the currency converter program indicating the date at which the rates are calculated. That information is provided by the CurrencyTable class using the getDate method. To display that information at the bottom of the window, you could add a fourth row to the table by changing the dimensions in the constructor and then adding the following code to the end of the init method:
|
The effect of this call is to add the JLabel reporting the date of the currency data to the TableLayout model for the program. However, instead of taking up a single column in the way that the other components do, the constraint string "gridwidth=2" tells the layout manager that this component should take up two columns in the grid, which ends up generating the following display:
 |
The strings used as constraint objects can set several constraints at once by including multiple constraint/value pairs separated by spaces. Moreover, for those constraints whose values are defined by named constants in the GridBagConstraints class, TableLayout allows that name to be used as the value field of the constraint string. For example, the following string indicates that a table cell should span two columns but that the component should fill space only in the y direction:
|
Constraint strings are checked at run time to make sure that the constraints and values are defined and are consistent. The case of letters, however, is ignored, which makes it possible to name the constraints in a way that is consistent with Java’s conventions. Thus, if you want to emphasize the case convention that has each word within a multiword identifier begin with an uppercase letter, it is equally effective to write
|
The TableLayout class accepts all of the constraints supported by GridBagLayout, but the ones students are most likely to find useful are shown in Figure 4-9.
Figure 4-9. Constraints supported by the TableLayout class
|
In addition to the standard GridBagLayout constraints, the TableLayout class uses two additional parameters—hgap and vgap—that apply to the layout as a whole rather than the individual cell. These parameters have the same interpretation as in other standard Java layout managers such as FlowLayout and BorderLayout. When the table is formatted, hgap pixels are left blank at the left and right edges and between each column; symmetrically, the layout manager leaves vgap blank pixels at the top and bottom edges and between each row. Although these values are typically positive, the implementation supports negative gaps, in which cells overlap by the specified number of pixels. The most common application for negative gaps occurs in displaying bordered components, which is illustrated in the CalendarDemo program described in section 4.6.
To make it easier to assemble nested containers hierarchically, the acm.gui package includes three convenience classes that extend JPanel but install an appropriate TableLayout manager. These classes and their constructor patterns appear in Figure 4-10. The HPanel and VPanel classes make it easy to create complex assemblages of interactors by decomposing them hierarchically into rows and columns. In this respect, they have a common purpose with the BoxLayout manager introduced in the javax.swing package. The panel HPanel and VPanel classes, however, offer far more flexibility because they have the full power of the TableLayout class. The BoxLayout manager, by contrast, makes it difficult to do anything except to string together components in a linear form with no control over spacing or format.
Figure 4-10. Convenience classes based on TableLayout
| ||||||||||||||||||
To give you a sense of how the layout manager for the Program class and the TableLayout class can be used in a more sophisticated contexts, this section presents the complete implementation of a program called CalendarDemo program that displays a calendar page. The user interface for the program appears in Figure 4-11 and the code to create the display appears in Figure 4-12.
Figure 4-11. Sample run of the CalendarDemo application [applet]
 |
The CalendarDemo program makes use of the full range of capabilities described in this chapter. The top row of controls uses the layout capabilities of the Program class to create controls for the calendar, including a JComboBox that can choose the language and style for a particular country. The main body of the calendar uses a TableLayout manager with seven columns. The rows and columns are also set to overlap by a pixel to ensure that there is only a single-pixel line dividing the individual cells. Finally, each day in the calendar is represented using a VPanel with a Swing border attached. The exciting thing about the program is that it offers some very sophisticated features—GUI-based control, tabular formatting, and internationalization—and still fits in three pages of code. Such is the power of Java in which you have so many resources on which to draw.
/*
 * File: CalendarDemo.java
 * -----------------------
 * This program uses the GUI layout mechanism to create a calendar
 * page.  The program uses the features of Java's Locale class to
 * internationalize the calendar.
 */

import acm.gui.*;
import acm.program.*;
import acm.util.*;
import java.awt.*;
import java.awt.event.*;
import java.text.*;
import java.util.*;
import javax.swing.*;
import javax.swing.border.*;

public class CalendarDemo extends Program implements ItemListener {

/** Initialize the graphical user interface */
   public void init() {
      setBackground(Color.WHITE);
      initCountryList();
      localeChooser = new JComboBox(countries);
      String country = Locale.getDefault().getDisplayCountry();
      localeChooser.setSelectedItem(country);
      localeChooser.addItemListener(this);
      add(new JButton("<-"), NORTH);
      add(localeChooser, NORTH);
      add(new JButton("->"), NORTH);
      currentCalendar = Calendar.getInstance();
      itemStateChanged(null);
      addActionListeners();
   }

/** Respond to a button action */
   public void actionPerformed(ActionEvent e) {
      int delta = (e.getActionCommand().equals("<-")) ? -1 : +1;
      currentCalendar.add(Calendar.MONTH, delta);
      updateCalendarDisplay(currentCalendar);
   }

/** Respond to a change in the locale selection */
   public void itemStateChanged(ItemEvent e) {
      if (e == null || e.getStateChange() == ItemEvent.SELECTED) {
         Date time = currentCalendar.getTime();
         Locale locale = LOCALES[localeChooser.getSelectedIndex()];
         currentCalendar = Calendar.getInstance(locale);
         currentCalendar.setTime(time);
         symbols = new DateFormatSymbols(locale);
         weekdayNames = symbols.getWeekdays();
         monthNames = symbols.getMonths();
         firstDayOfWeek = currentCalendar.getFirstDayOfWeek();
         updateCalendarDisplay(currentCalendar);
      }
   }
/* Update the calendar display when a new month is selected */
   private void updateCalendarDisplay(Calendar calendar) {
      removeAll();
      setLayout(new TableLayout(0, 7, -1, -1));
      add(createMonthLabel(calendar), "gridwidth=7 bottom=3");
      for (int i = 0; i < 7; i++) {
         add(createWeekdayLabel(i), "weightx=1 width=1 bottom=2");
      }
      int weekday = getFirstWeekdayIndex(calendar);
      for (int i = 0; i < weekday; i++) {
         add(createDayBox(null), "weighty=1");
      }
      int nDays = getDaysInMonth(calendar);
      for (int day = 1; day <= nDays; day++) {
         add(createDayBox("" + day), "weighty=1");
         weekday = (weekday + 1) % 7;
      }
      while (weekday != 0) {
         add(createDayBox(null), "weighty=1");
         weekday = (weekday + 1) % 7;
      }
      validate();
   }

/* Generate the header label for a particular month */
   private JLabel createMonthLabel(Calendar calendar) {
      int month = calendar.get(Calendar.MONTH);
      int year = calendar.get(Calendar.YEAR);
      String monthName = capitalize(monthNames[month]);
      JLabel label = new JLabel(monthName + " " + year);
      label.setFont(JTFTools.decodeFont(TITLE_FONT));
      label.setHorizontalAlignment(JLabel.CENTER);
      return label;
   }

/* Create a label for the weekday header at the specified index */
   private JLabel createWeekdayLabel(int index) {
      int weekday = (firstDayOfWeek + index + 6) % 7 + 1;
      JLabel label = new JLabel(capitalize(weekdayNames[weekday]));
      label.setFont(JTFTools.decodeFont(LABEL_FONT));
      label.setHorizontalAlignment(JLabel.CENTER);
      return label;
   }

/* Compute the number of days in the current month */
   private int getDaysInMonth(Calendar calendar) {
      calendar = (Calendar) calendar.clone();
      int current = calendar.get(Calendar.DAY_OF_MONTH);
      int next = current;
      while (next >= current) {
         current = next;
         calendar.add(Calendar.DAY_OF_MONTH, 1);
         next = calendar.get(Calendar.DAY_OF_MONTH);
      }
      return current;
   }
/* Compute the index of the first weekday for the current Locale */
   private int getFirstWeekdayIndex(Calendar calendar) {
      int day = calendar.get(Calendar.DAY_OF_MONTH);
      int weekday = calendar.get(Calendar.DAY_OF_WEEK);
      int weekdayIndex = (weekday + 7 - firstDayOfWeek) % 7;
      return ((5 * 7 + 1) + weekdayIndex - day) % 7;
   }

/* Create a box for a calendar day containing the specified text */
   private Component createDayBox(String text) {
      VPanel vbox = new VPanel();
      if (text== null) {
         vbox.setBackground(EMPTY_BACKGROUND);
      } else {
         JLabel label = new JLabel(text);
         label.setFont(JTFTools.decodeFont(DATE_FONT));
         vbox.add(label, "anchor=NORTHEAST top=2 right=2");
         vbox.setBackground(Color.WHITE);
      }
      vbox.setOpaque(true);
      vbox.setBorder(new LineBorder(Color.BLACK));
      return vbox;
   }

/* Create a list of country names from the list of Locales */
   private void initCountryList() {
      countries = new String[LOCALES.length];
      for (int i = 0; i < LOCALES.length; i++) {
         countries[i] = LOCALES[i].getDisplayCountry();
      }
   }

/* Capitalize the first letter of a word */
   private String capitalize(String word) {
      return word.substring(0, 1).toUpperCase() + word.substring(1);
   }

/* Private constants */
   private static final Color EMPTY_BACKGROUND = new Color(0xDDDDDD);
   private static final String TITLE_FONT = "Serif-36";
   private static final String LABEL_FONT = "Serif-bold-14";
   private static final String DATE_FONT = "Serif-18";
   private static final Locale[] LOCALES = {
      new Locale("fr", "FR", ""), new Locale("de", "DE", ""),
      new Locale("es", "MX", ""), new Locale("it", "IT", ""),
      new Locale("nl", "NL", ""), new Locale("es", "ES", ""),
      new Locale("en", "GB", ""), new Locale("en", "US", "")
   };

/* Private instance variables */
   private JComboBox localeChooser;
   private String[] countries;
   private Calendar currentCalendar;
   private DateFormatSymbols symbols;
   private String[] monthNames;
   private String[] weekdayNames;
   private int firstDayOfWeek;
}
|

|
JTF Tutorial—July 31, 2006 |
 |