
|
JTF > Rationale > The acm.graphics Package |
One of the most widely cited problems in teaching Java—identified as problem A2 in the taxonomy from Chapter 3—is the lack of a graphics facility that is simple enough for novices to use. This problem has been identified as critical by several authors
Java has many little features that I thought might be a problem in CS1, but in almost every case they worked out fine. Graphics was the one exception.[Parlante04a]
Given the perceived importance of the problem, we were not surprised to find that graphical packages were heavily represented among the solution strategies submitted to the Java Task Force. These packages fall into three categories:
After discussing these strategies at a Task Force meeting, we decided to pursue only the first approach, although we also provide enabling technology for “turtle graphics” along the lines suggested by Ken Lambert and Martin Osborne in their submission to the Task Force
We were, however, convinced of the value of supporting a simple, object-based graphics facility that allows students to assemble figures by creating a graphical canvas and then adding graphical objects to it. The advantages of having such a package include:
Although we were convinced that an object-based graphics package had to be one of our deliverables, none of the submissions in response to our call for proposals was in fact ideal. Each of these proposals has strengths and weaknesses, as outlined in Figure 5-1. The proposals therefore served as a foundation for the design of a new package that incorporates the best features of each. The result of that design effort is the acm.graphics package, which defines an extensible hierarchy of graphical objects rooted at the GObject class. The subsections that follow offer an overview of acm.graphics and describe the design decisions involved in its development.
Figure 5-1. Strengths and weaknesses of the proposed graphics packages
|
One of the fundamental design decisions in the development of any graphics package is the choice of the graphical model, primarily in terms of its coordinate system. Although one of the proposals
There was, however, one change that the Task Force decided—after extensive debate—would be worth adopting. All but one of the graphics proposals we received chose to use
The Task Force gave detailed consideration to three options for the coordinate system:
The Task Force experimented with each of these options but ultimately chose to go with Option #2. Although the introduction of the new double-precision classes GPoint, GDimension, and GRectangle adds some complexity, the conceptual integrity of using
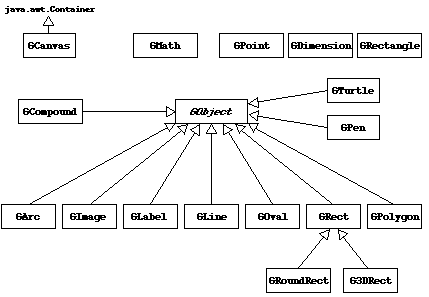
The classes that make up the acm.graphics hierarchy are shown in Figure 5-2. The central class in the hierarchy shown in the diagram is the abstract GObject class, which is the common superclass of all graphical objects that can be displayed on a graphical canvas. The implementation for the graphical canvas is in turn supplied by the GCanvas class, which is described in section 5.5. Descending from GObject is a set of classes—collectively referred to as shape classes—that correspond to the figures one can draw in the original definition of the java.awt.Graphics class. Thus, if the Graphics class includes a
Figure 5-2. Class diagram for the acm.graphics package
 |
The design of the hierarchy, however, was not without controversy. Because many of the shape classes share common structural characteristics (GImage, GOval, and GRect, for example, all share rectangular frames), changing the class hierarchy to reflect those similarities offers an opportunity for code sharing. To take advantage of that opportunity, both the OOPS and objectdraw submissions include intermediate classes that enable code-sharing for those classes that support common operations. This strategy leads to a hierarchy that includes ovals and images under an abstract intermediate class, which is called RectangularShape in OOPS and Rect in the submitted version of objectdraw.
The Task Force concluded that the definition of such intermediate classes was problematic for the following reasons:
Given these concerns, the design we finally adopted has the simple class hierarchy shown in Figure 5-2. No intermediate classes exist in the package, thereby simplifying its conceptual structure. The common characteristics shared by sets of classes are instead specified by the interfaces GFillable, GResizable, and GScalable, which are discussed in section 5.3.
The shape classes included in the acm.graphics package do not by themselves constitute a complete graphics framework. In order to display a GObject on the screen, the student needs to add it to some sort of “canvas” that is part of the standard window system. That role is fulfilled in acm.graphics by the GCanvas class, which is described in section 5.5. We expect most adopters of the package to use the GCanvas that is automatically provided by the GraphicsProgram class, which is part of the Program class hierarchy described in Chapter 6. It is, however, straightforward to instantiate a GCanvas and then embed it inside a standard JFrame.
The acm.graphics package diagram shown in Figure 5-2 contains several additional classes beyond those that have already been described. The GMath class provides an extended set of mathematical methods that are useful for graphical programs and is described in section 5.4. The GCompound class makes it possible to define one GObject as a collection of others. This facility is described in section 5.7. The GPen class provides a simple mechanism for constructing line drawings that adopts a conceptual model of a pen drawing on the canvas. The GTurtle class is similar in many respects, but offers a somewhat more restricted (and arguably more intuitive) graphical model based on the “turtle graphics” paradigm described in Seymour Papert’s Mindstorms
The question of what methods graphical objects should support required considerable time for the Task Force to reach closure. The first step toward determining the appropriate functionality for graphical objects was to survey the capabilities of the various graphics packages that had been proposed. From there, our next challenge was to understand how best to implement that functionality in a way that would be simple, consistent, and versatile. The next two subsections describe each of these activities in more detail, and the remaining subsections describe design decisions associated with specific shape classes.
The proposals received by the Java Task Force differ in many respects, but nonetheless share a similar underlying model. In each of the submitted designs, the student creates pictures by instantiating graphical objects, installing them (sometimes implicitly by including the canvas as a parameter to the constructor) on a canvas of some sort, and then manipulating the display by sending messages to the objects to change their state and appearance.
A comparison of the methods available to graphical objects in the various models appears in Figure 5-3. As the table shows, every package made it possible for the student to specify the location, size, and color of an object. Beyond those basic capabilities, however, the methods supported by the individual packages differed in many ways. What the Task Force sought to do was to choose the best features of each proposed package, as long as those features could be implemented consistently and cleanly. The acm.graphics package supports all the features shown in Figure 5-3 with the exception of those in the last line, which were not included in the final package design for the following reasons:
Figure 5-3. Comparison of features provided in the submissions
|
|
That proposal also makes every graphical object capable of containing other graphical objects. The notion of nested graphical objects seems defensible as an idea, but not in such an undisciplined way. The Task Force strategy for implementing nested objects is outlined in section 5.8.
When we adopted features from the various submissions, we often implemented them in a somewhat different way than the initial conception. Our principal reasons for making such changes were to provide more extensive functionality or to maintain greater consistency among the different parts of the package. The most important design decisions along these lines are as follows:
One of the central issues in the design of the GObject class and the standard shape classes arises from the fact that the various shape classes have different behavioral characteristics and therefore require individualized sets of methods. Although it makes perfect sense to fill a GRect or GOval, filling is not appropriate for GImage or GLabel. Several members of the Java Task Force felt it was important to define each shape class so that it responded only to messages appropriate to graphical objects of that type. Such a design makes it possible to catch at compile time any attempts to invoke inappropriate methods. Adopting that principle ruled out an earlier design in which the GObject class defined an expansive set of methods, with each subclass either ignoring or generating runtime errors for methods that were inappropriate to that class.
The strategy that we eventually adopted was to include in GObject only those methods that are common to all graphical objects and to defer to each subclass the additional methods that make sense only in that domain. These additional methods are collected into standard suites identified by interfaces. As an example, the shape classes that implement GFillable respond to the methods setFilled, isFilled, setFillColor, and getFillColor. The public methods defined for all graphical objects appear in Figure 5-4, and the additional methods specified by interfaces appear in Figure 5-5.
Figure 5-4. Methods common to all graphical objects
| |||||||||||||||||||||||||||||||||||||||
Figure 5-5. Additional methods specified by interfaces
| ||||||||||||||||||||||
The simplest and most intuitive of the shape classes defined in acm.graphics is the GRect class, which represents a rectangular box. This class implements the GFillable, GResizable, and GScalable interfaces, but otherwise includes no other methods except its constructors.
The one important design decision to observe in the implementation not only of GRect but the other shape classes as well concerns the relationship between the screen area covered by the filled and outlined versions of the corresponding shapes. In the standard Graphics class, a rectangle outlined using drawRect does not cover the same pixels as the one generated by fillRect; the filled rectangle is one pixel smaller in each dimension because the filled figure does not include the framing pixels on the right and bottom edges of the outline. In the acm.graphics package, a filled shape is, in essence, both framed and filled, and therefore covers exactly the same pixels in either mode. This definition was necessary to support separate fill and frame colors and is also likely to generate less confusion for students.
The two specialized forms of rectangles—GRoundRect and G3DRect—appear in the hierarchy as subclasses of GRect. The purpose of introducing this additional layer in the hierarchy (which could equally easily have been implemented as a flat collection of the various shapes) was to provide an intuitively compelling illustration of the nested hierarchies. Just as all the shape classes are graphical objects (and therefore subclasses of GObject), the GRoundRect and G3DRect classes are graphical rectangles (and therefore subclasses of GRect). Organizing the hierarchy in this way emphasizes the is-a relationship that defines subclassing.
The GRoundRect and G3DRect classes include additional method definitions that allow clients to set and retrieve the properties that define their visual appearance. For GRoundRect, these properties are the specifications of corner curvature, expressed exactly as in the drawRoundRect method; for G3DRect, the additional methods allow the client to indicate whether the rectangle should appear raised.
The GOval class represent an elliptical shape which is defined so that the parameters of its constructor match the arguments to the drawOval and fillOval methods in the standard Java Graphics class. Once students understand that an oval is specified by its bounding rectangle and not by its center point, using the GOval class is quite straightforward. Like GRect, the GOval class implements the GFillable, GResizable, and GScalable interfaces but otherwise includes no methods that are specific to the class.
The complication in GOval lies in its implementation. In many implementations of the Java Graphics class across a range of platforms, the pixels drawn by a call to fillOval do not precisely match the pixels in the interior of the shape drawn by drawOval. As a result, it is often the case that a filled GOval rendered using the standard methods from the Java Graphics class ends up with unpainted pixels just inside the boundary. When we discovered this problem, the Task Force decided that we had to fix things so that ovals and arcs were always completely filled. Adopters of the package would undoubtedly regard the unsatisfying appearance of ovals and arcs as a bug in the ACM libraries, even if the actual source of that bug was inside the standard Java libraries.
To circumvent this rendering bug, the acm.graphics package ordinarily draws
Given that some students are likely to have preconceptions that the “width” of a line refers to its thickness, it is important to emphasize that the methods getWidth, getHeight, and getSize are defined for the GLine class in precisely the way that they are for all other
The GLine class also contains several methods for determining and changing the endpoints of the line. The setStartPoint method allows clients to change the first endpoint of the line without changing the second; conversely, setEndPoint gives clients access to the second endpoint without affecting the first. These methods are therefore different in their operation from setLocation, which moves the entire line without changing its length and orientation.
 The GArc class raises a variety of interesting design issues, particularly in terms of seeking to understand the relationship between a filled arc and an unfilled one. To ease the transition to the standard Java graphics model, we chose to implement the GArc class so that its operation was as consistent as possible with the drawArc and fillArc methods in the standard Graphics class. An unfilled arc, therefore, displays only the pixels on the arc boundary; a filled arc fills the entire wedge-shaped region, as shown on the right.
Adopting the standard Java interpretation of arc filling has implications for the design of the GArc object. Most notably, the contains method for the GArc class returns a result that depends on whether the arc is filled. For an unfilled arc, containment implies that the arc point is actually on the arc, subject to the same interpretation of “closeness” as described for lines in the preceding section. For a filled arc, containment implies inclusion in the wedge. This definition of containment is necessary to ensure that mouse events are transmitted to the arc in a way that matches the user’s intuition.
To match Java’s interpretation, the bounds for a GArc object are indicated by specifying the enclosing rectangle along with the starting angle and sweep extent of the arc. The constructor for GArc therefore has the following signature:
|
Given that the constructor specifies rectangular bounds, it would at first seem appropriate to have GArc implement GResizable and support operations like setSize and setBounds. Doing so, however, could easily create confusion. In contrast to the situation for ovals, rectangles, and images, the rectangle used to define the size of a GArc is not the same as the bounding box for that object. Thus, supporting the method setBounds in the obvious way would generate the surprising situation that a subsequent call to getBounds would typically return a smaller rectangle.
To avoid this possible source of confusion, GArc does not implement GResizable, but instead implements the methods setFrameRectangle and getFrameRectangle. These methods allow clients to change or retrieve the rectangle that defines the arc while minimizing the likelihood of confusion with getBounds, which is defined in the acm.graphics package to return the bounding box.
The GArc class includes methods that enable clients to manipulate the angles defining the arc (setStartAngle, getStartAngle, setSweepAngle, and getSweepAngle) as well as methods to return the points at the beginning and end of the arc (getStartPoint and getEndPoint).
One interesting question that arose in the Task Force discussion was what effect, if any, the setColor method should have for the GImage class. Initially, some members of the Task Force had suggested that the inclusion of the GImage class in the hierarchy meant that we needed to define an interface called GColorable that all shape classes except GImage would implement. It turns out, however, that the drawImage method in the Graphics class offers a straightforward interpretation of the color of an image as the background color that shows through any transparent or translucent pixels. By using the color of the object to specify this background, clients can use setColor to tint an image as long as that image includes pixels that are less than fully opaque. If the image contains only opaque pixels, setting its color has no effect.
In contrast to the design of the abstract interface, the implementation of GImage involves some complexity, mostly in terms of having the package know how to load images from the environment. The implementation of search paths for images and the associated mechanisms to ensure that images work in both applet and application contexts is described in the discussion of the MediaTools class in Chapter 8.
To provide yet another simplification for introductory students, the GLabel class includes an overloaded definition of setFont that takes a string rather than a Font object. The string is interpreted in the manner specified by Font.decode. Thus, to set the font of a GLabel variable called label to be an 18-point, boldface, sans-serif font (typically Helvetica), the student could simply write
|
As an extension to the semantics of Font.decode, the setFont method interprets an asterisk in the string as signifying the previous value. Thus, students can set the style of a label to be italic by writing
|
without changing its family or size.
The shape that represents the greatest deviation from the traditional Java model is the GPolygon class, which is used to draw closed polygonal shapes. Although the inspiration for GPolygon comes from the drawPolygon method in the standard Graphics class, the acm.graphics package does not adopt the same model as java.awt, for a variety of sound pedagogical reasons:
The GPolygon class adopts a model that avoids each of these problems. The basic idea is that the student creates a GPolygon, which is initially empty. Starting with that empty polygon, the student adds new vertices using a set of methods (addVertex, addEdge, and addPolarEdge) that add vertices to the polygon.
 These methods are easiest to illustrate by example. The simplest method to explain is addVertex(x, y), which adds a vertex at the point (x, y) relative to the location of the polygon. For example, the following code defines a diamond-shaped polygon in terms of its vertices, as shown in the diagram at the right:
|
The diamond is drawn so that its center is at the point (0, 0) in the coordinate space of the polygon. Thus, if you were to add diamond to a GCanvas and set its location to the point (300, 200), the diamond would be centered at that location.
The addEdge(dx, dy) method is similar to addVertex, except that the parameters specify the displacement from the previous vertex to the current one. One could therefore draw the same diamond by making the following sequence of calls:
|
Note that the first vertex must still be added using addVertex, but that subsequent ones can be defined by specifying the edge displacements. Moreover, the final edge is not explicitly necessary because the polygon is automatically closed before it is drawn.

Some polygons are easier to define by specifying vertices; others are more easily represented by edges. For many polygonal figures, however, it is even more convenient to express edges in polar coordinates. This mode of specification is supported in the GPolygon class by the method addPolarEdge, which is identical to addEdge except that its arguments are the length of the edge and its direction expressed in degrees counterclockwise from the +x axis. This method makes it easy to create figures with more sophisticated structure, such as the centered hexagon generated by the following method (as shown on the right using 36 pixels as the value of side):
|
The GPolygon class implements the GFillable and GScalable interfaces, but not GResizable. It also supports the method rotate(theta), which rotates the polygon theta degrees counterclockwise around its origin.
The one addition to the code class since the original release is the addArc method, which is used to add a series of edges to a polygon so that it approximates an elliptical arc. The addArc has the parameter structure
|
where each of the parameters matches its counterpart in the code constructor. The only difference is that the x and y parameters specifying the corner of the bounding box for the arc are not specified explicitly. Instead, these values are computed so that the current vertex in the polygon becomes the first point in the arc. This strategy makes it easy to add a series of lines and arcs to a GPolygon and gives the GPolygon class the full set of capabilities associated with the Stanford C/C++ graphics library
As an example, the following method creates a GPolygon object that has the same appearance on the screen as a GRoundRect object constructed with the same parameters:
|

Although it seems at first glance that the addArc does not provide any additional functionality, the fact that it adds edges to a polygon makes it possible to create filled shapes that cannot be created using the GArc class alone. A simple example is the lens shape shown at the right, which is created by the following code:
|
One of the most important applications of the GPolygon class consists of creating extended GObject subclasses that have a particular shape. That technique is described in section 5.8.
In the February 2005 release of the acm.graphics package, the GObject class included a number of static constant definitions (primarily the color names such as RED) along with a collection of static methods intended to make it easier for students to calculate trigonometric relationships for angles measured in degrees. In the current release, the constants have been eliminated, and the static methods have been moved into a separate class called GMath, which exports the methods shown in Figure 5-6. The reasons that led us to make these change are as follows:
Figure 5-6. Static methods in the GMath class
| |||||||||||||||||||||
The GCanvas class provides the link between the world of graphical objects and the Java windowing system. Conceptually, the GCanvas class acts as a container for graphical objects and allows clients of the package to add and remove elements of type GObject from an internal display list. When the GCanvas is repainted, it forwards paint messages to each of the graphical objects it contains. Metaphorically, the GCanvas class acts as the background for a collage in which the student, acting in the role of the artist, positions shapes of various colors, sizes, and styles.
The methods supported by the implementation of the GCanvas class in the acm.graphics package are shown in Figure 5-7.
Figure 5-7. Public methods in the GCanvas class
| |||||||||||||||||||||||||||||||||||||
The first set of methods in Figure 5-7 is straightforward given the fact that a GCanvas is conceptually a container for GObject values. The container metaphor explains the functionality provided by the add, remove, and removeAll methods in Figure 5-7, which are analogous to the identically named methods in JComponent or Container.
Interestingly, none of the three submitted proposals chose to implement the relationship between graphical objects and their canvases using this metaphor of adding objects to a container. In each of the packages, the container is specified—implicitly in the case of OOPS—at the time the graphical object is constructed. Such an design seems less than ideal for three reasons. First, the strategy runs counter to the model provided by components and containers and will therefore provide no help when the student moves on Swing. Second, such a restriction seems to violate the intuitive notion of a collage, in which one creates freestanding objects and then pastes them on a canvas. Third, you often need to have the object to know where to put it in the container, as illustrated by the following code, which centers a GLabel object in the GCanvas named gc:
|
It’s not clear how you would put the object in the right place without being able to instantiate the freestanding object. The best you could do would be add it somewhere else (possibly invisibly, as in OOPS) and then move it to the center.
The next set of methods from Figure 5-7 provide analogous capabilities for adding and removing an AWT or Swing component from a GCanvas. Students who have gotten into the habit of adding a GObject to a GCanvas will find it natural to add some other graphical object—a JButton perhaps—to a GCanvas as well. As an example, the code
|
produces a display such as the one shown on the right. The JButton is fully active and can accept listeners, just as it can in any other context.
Given that GCanvas is a subclass of Container, the simple versions of the add and remove methods already exist by inheritance, although it is useful to reimplement these methods slightly to give them more useful semantics. The first change is that GCanvas objects should use null as their default layout manager so that the positioning of the components is under client control, just as is true for graphical objects. Second, the add method must check the size of the component and set it to its preferred size if its bounds are empty. These simple changes seem to do exactly what students would want.
The third set of methods in Figure 5-7 make it possible for clients to figure out what graphical elements have been added to a GCanvas and provide a couple of approaches for doing so. The strategy that fits best with modern disciplines for using Java is to use an iterator that runs through the elements of a collection. The iterator method provides that functionality in the conventional Java form, making it possible to write
|
or, in Java 5.0, the abbreviated form
|
Unfortunately, there are two reasonable orders in which to process the elements of a GCanvas. If you are doing something analogous to painting, you want to go through the elements from back to front so that the elements at the front of the stacking order correctly obscure those behind them. On the other hand, if you are fielding mouse events, you want to go through the elements from front to back so that primacy on receiving the event goes to the graphical objects in front. (Both painting and mouse-event dispatching are provided by the package, so students need not code these two mechanisms, but might sometime want to do something similar.) To permit both strategies, the iterator method takes an optional argument that can be either BACK_TO_FRONT or FRONT_TO_BACK to specify the desired order along the z-axis. The default is BACK_TO_FRONT.
To support instructors who choose not to introduce iterators as early as they cover the acm.graphics package, the GCanvas class also exports the methods getElementCount and getElement, which make it possible to sequence through the elements in any order.
The evolutionary history of Java provides two distinct models for responding to mouse events. The model that was defined for JDK 1.0 was based on callback methods whose behavior was defined through subclassing. Thus, to detect a mouse click on a component, you need to define a subclass that overrides the definition of mouseDown with a new implementation having the desired behavior. That model was abandoned in JDK 1.1 in favor of a new model based on event listeners. Under this paradigm, you add the necessary suite of methods to implement MouseListener to some class and then add some object of that class as a listener on the component whose events you want to catch. These models are quite different, and there is no obvious sense in which learning one helps prepare you to learn the other.
The two submitted packages that offer mouse support each provide a mechanism for responding to mouse events whose design use a callback model rather than listeners. The graphical object types in the OOPS proposal, for example, define methods for mousePressed, mouseReleased, mouseClicked, and mouseDragged (but not, interestingly, mouseMoved, mouseEntered, or mouseExited) that are invoked whenever the specified event is detected over that object. In objectdraw, mouse events generated on the graphical canvas are eventually handled in methods contained in class WindowController, which is the extension of JApplet that contains that canvas. Students write a class extending WindowController and then override the event-handling methods whose behavior they wish to specify.
There are certainly some ways in which the callback strategy is simpler for novices. At the same time, we believe that many potential adopters will insist on using Java’s event listeners to ensure that students can more easily make the transition to the standard Java paradigm. It is, of course, possible to use listeners under any of these packages simply by adding the appropriate listener to whatever class plays the role of the canvas and fielding the events from there. The difficulty, however, is that the most intuitive model for event handling—and the one that corresponds to the behavior of the JComponent hierarchy—would have the graphical objects be the source for the events rather than the canvas in which those objects are contained.
To illustrate the distinction, it is useful to consider how one might use the mouseEntered and mouseExited methods in a canvas-based listener. Although one can construct situations in which you need to notice that the mouse has entered the canvas, what most students are likely to want is some way of detecting when the mouse has entered one of their objects. Such a capability enables, for example, the simulation of roll-over buttons, which students seem to love.
To support that style of interaction, the acm.graphics enables mouse event listening for the GObject class. As an illustration of this behavior, the methods
|
define listener methods that implement rollover behavior for any GObject that adds a mouse listener containing this code. Moving the mouse into the containment region of the object turns the object red; moving the mouse out again turns it black.
Although the primary examples of mouse-event handling appear in the discussion of the GraphicsProgram class in Chapter 6, Figure 5-8 illustrates how you can work with mouse events generated by
Figure 5-8. Program to illustrate mouse dragging in an application
import java.awt.*;
import java.awt.event.*;
import javax.swing.*;
import acm.graphics.*;

/** This class displays a mouse-draggable rectangle and oval */
public class DragUsingStandaloneJFrame extends JFrame
   implements MouseListener, MouseMotionListener {

/** Initializes and installs the objects in the JFrame */
   public ObjectDragExample() {
      gc = new GCanvas();
      GRect rect = new GRect(100, 100, 150, 100);
      rect.setFilled(true);
      rect.setColor(Color.RED);
      rect.addMouseListener(this);
      rect.addMouseMotionListener(this);
      gc.add(rect);
      GOval oval = new GOval(300, 115, 100, 70);
      oval.setFilled(true);
      oval.setColor(Color.GREEN);
      oval.addMouseListener(this);
      oval.addMouseMotionListener(this);
      gc.add(oval);
      getContentPane().add(BorderLayout.CENTER, gc);
      setSize(500, 300);
   }

/** Called on mouse press to record the coordinates of the click */
   public void mousePressed(MouseEvent e) {
      last = new GPoint(e.getPoint());
   }

/** Called on mouse drag to reposition the object */
   public void mouseDragged(MouseEvent e) {
      GObject gobj = (GObject) e.getSource();
      GPoint pt = new GPoint(e.getPoint());
      gobj.move(pt.getX() - last.getX(), pt.getY() - last.getY());
      last = pt;
   }

/** Called on mouse click to move this object to the front */
   public void mouseClicked(MouseEvent e) {
      ((GObject) e.getSource()).sendToFront();
   }

   public void mouseReleased(MouseEvent e) { }
   public void mouseEntered(MouseEvent e) { }
   public void mouseExited(MouseEvent e) { }
   public void mouseMoved(MouseEvent e) { }

/** Standard entry point for the application */
   public static void main(String[] args) {
      new ObjectDragExample().show();
   }

/* Private state */
   private GCanvas gc;
   private GPoint last;

} |
From the programmer’s perspective, the design of the event-handling mechanism in the acm.graphics package remains unchanged from what it was at the time of the February 2005 draft. The underlying implementation, however, is considerably more efficient. In the initial release, the location of each mouse event was checked against every GObject in the canvas to see if it was interested. Beginning with the beta release in February 2006, the implementation maintains a separate list of
The most significant improvements in terms of support for interactivity and graphical animation that have been introduced since the February 2005 draft have been in packages other than acm.graphics and are therefore described in other sections of this document. Of these, the most important are in the discussion of the GraphicsProgram class in Section 6.4, the acm.gui package in Chapter 7, and the Animator class in Section 8.5. There is also considerable discussion of animation and interactivity topics in Chapter 3 of the JTF Tutorial.
The shape classes that appear at the bottom of Figure 5-2 represent “atomic” shapes that have no internal components. Although the GCanvas class makes it possible to position these shapes on the display, it is often useful to assemble several atomic shapes into a “molecule” that you can then manipulate as a unit. The need to construct this type of compound units provides the motivation behind the inclusion of the GCompound class, in the acm.graphics package. The methods available for GCompound are in some sense the union of those available to the GObject and GCanvas classes. As a GObject, a GCompound responds to method calls like setLocation and scale; as an implementer (like GCanvas) of the GContainer interface, it supports methods like add and remove.
To understand how the GCompound class works, it is easiest to start with a simple example. Imagine that you wanted to assemble the following face on the canvas:
 |
For the most part, this figure is easy to create. All you need to do is create a new GOval for the head, two
The code in Figure 5-9 uses the GCompound class to define a GFace class that contains the necessary components. These components are created and then added in the appropriate places as part of the GFace constructor. Once you have defined the class, you could construct a new GFace object and add it to the center of the canvas using the following code:
|
Figure 5-9. Program to create a GFace class by extending GCompound
/*
 * File: GFace.java
 * ----------------
 * This file defines a compound GFace class.
 */

import acm.graphics.*;

/**
 * This code defines a new class called GFace, which is a compound
 * object consisting of an outline, two eyes, a nose, and a mouth.
 * The origin point for the face is the center of the figure.
 */
public class GFace extends GCompound {

/** Construct a new GFace object with the specified dimensions. */
   public GFace(double width, double height) {
      head = new GOval(width, height);
      leftEye = new GOval(EYE_WIDTH * width, EYE_HEIGHT * height);
      rightEye = new GOval(EYE_WIDTH * width, EYE_HEIGHT * height);
      nose = createNose(NOSE_WIDTH * width, NOSE_HEIGHT * height);
      mouth = new GRect(MOUTH_WIDTH * width, MOUTH_HEIGHT * height);
      add(head, -width / 2, -height / 2);
      add(leftEye, -0.25 * width - EYE_WIDTH * width / 2,
                   -0.25 * height - EYE_HEIGHT * height / 2);
      add(rightEye, 0.25 * width - EYE_WIDTH * width / 2,
                    -0.25 * height - EYE_HEIGHT * height / 2);
      add(nose, 0, 0);
      add(mouth, -MOUTH_WIDTH * width / 2,
                 0.25 * height - MOUTH_HEIGHT * height / 2);
   }

/** Creates a triangle for the nose */
   private GPolygon createNose(double width, double height) {
      GPolygon poly = new GPolygon();
      poly.addVertex(0, -height / 2);
      poly.addVertex(width / 2, height / 2);
      poly.addVertex(-width / 2, height / 2);
      return poly;
   }

/* Constants specifying feature size as a fraction of the head size */
   private static final double EYE_WIDTH    = 0.15;
   private static final double EYE_HEIGHT   = 0.15;
   private static final double NOSE_WIDTH   = 0.15;
   private static final double NOSE_HEIGHT  = 0.10;
   private static final double MOUTH_WIDTH  = 0.50;
   private static final double MOUTH_HEIGHT = 0.03;

/* Private instance variables */
   private GOval head;
   private GOval leftEye, rightEye;
   private GPolygon nose;
   private GRect mouth;
} |
The general paradigm for using GCompound is to create an empty instance of the class and then to add other graphical objects to it. The coordinates at which these objects appear are expressed relative to the origin of the GCompound itself, and not to the canvas in which the compound will eventually appear. This strategy means that you can add a compound object to a canvas and the move all its elements as a unit simply by setting the location of the compound. Thus, once you had created the GFace object described in the preceding section, you could move the entire face 20 pixels to the right by executing the following method:
|
In some cases—most notably when you need to translate the coordinates of a mouse click, which are expressed in the global coordinate space of the canvas—it is useful to be able to convert coordinates from the local coordinate space provided by the GCompound to the coordinate space of the enclosing canvas, and vice versa. These conversions are implemented by the methods
|
and
|
The complete set of methods available for the GCompound class appears in Figure 5-10.
Figure 5-10. Public methods in the GCompound class (plus those inherited from GObject)
| |||||||||||||||||||||||||||||||||||
The question of whether to include GCompound in the acm.graphics package prompted considerable discussion within the Java Task Force. The arguments against including it are predicated largely on the principle of minimizing complexity: all other things being equal, it’s best to define as few classes as possible to achieve the desired goal of producing a usable object-based graphics package. The GCompound class, by definition, provides no new capabilities in terms of what clients of the package can draw on the screen. By contrast, the arguments in its favor are:
With only 18 classes and four interfaces, the acm.graphics package is small enough for teachers and students to understand the whole of the design in a relatively short amount of time. Despite its modest size, however, the facilities provided by the package enable students to construct extremely sophisticated designs. For simple applications, the classes provided by the package are sufficient. As applications become larger and more complex, clients of the acm.graphics package will find it useful to extend the basic functionality by defining new classes that build on the existing ones. The next few subsections describe four strategies for extending the predefined object hierarchy, as follows:
|
In this example, the class GFilledSquare represents a rectangle object that is initially square (in the sense that only a single dimension is required for both width and height) and filled; GRedSquare extends that class to create a filled square that is initially red.
While this simple style of extension is accessible to introductory students, it is problematic for two reasons. First, its use is limited to those cases in which an existing class can be made to draw the desired figure. Second, this extension model creates class names that imply properties for an object without any guarantee that those properties can be maintained. Since GFilledSquare and GRedSquare both inherit all the methods of GRect and GObject, clients would be able to change the initial properties at will. Thus, an object declared to be a GRedSquare could end up being a green rectangle after a couple of client calls. It therefore seems preferable—at least for pedagogical reasons—to adopt one of the alternative extension models described in a subsequent section.

As it turns out, the extension style that has proven to be most useful in practice consists of defining new subclasses of GPolygon, which was described in section 5.3. The basic strategy is to use the GPolygon class as the base class for a new shape class whose outline is a polygonal region. This technique is illustrated by the GStar class in Figure 5-11, which draws the five-pointed star shown on the right. The only complicated part of the class definition is the geometry required to compute the coordinates of the starting point of the figure.
The constructor for the GStar class ends with a call to the protected GPolygon method markAsComplete, which prohibits clients from adding more vertices to the polygon. This call protects the integrity of the class and makes it impossible for clients to change the shape of a GStar object to something else.
Figure 5-11. Class definition for a five-pointed star
/*
 * File: GStar.java
 * ----------------
 * This file illustrates the strategy of subclassing GPolygon by
 * creating a new GObject class depicting a five-pointed star.
 */

import acm.graphics.*;

public class GStar extends GPolygon {

   public GStar(double size) {
      double sinTheta = GMath.sinDegrees(18);
      double b = 0.5 * sinTheta / (1.0 + sinTheta);
      double edge = (0.5 - b) * size;
      addVertex(-size / 2, -b * size);
      int angle = 0;
      for (int i = 0; i < 5; i++) {
         addPolarEdge(edge, angle);
         addPolarEdge(edge, angle + 72);
         angle -= 72;
      }
      markAsComplete();
   }

   public GStar(double x, double y, double size) {
      this(size);
      setLocation(x, y);
   }

} |
Although the GPolygon class is useful in a variety of contexts, it is limited to those applications in which the desired graphical object can be described as a simple closed polygon. Many graphical objects that one might want to define don’t fit this model. Fortunately, the GCompound class described in section 5.7 provides the basis for a much more powerful extension mechanism. Given that the predefined shape classes defined in acm.graphics are precisely aligned with the drawing capabilities available in the Graphics class from java.awt, anything that one could draw using the traditional Java paradigm can be described as a collection of shape objects, which makes it possible to use GCompound to encapsulate figure Java could draw as a single graphical object.
 As a practical application of the extension capabilities provide by GCompound, consider the code in Figure 5-12. The idea behind the GVariable class is to create a new graphical object that represents a traditional box diagram of a variable, such as the one shown at the right. In terms of its graphical representation, the GVariable has three components: a GRect that displays the box, a GLabel to display the variable name, and another GLabel representing the value. To the client, however, the GVariable offers a conceptual interface that supports setting and retrieving the value of the variable, which is represented as an arbitrary object. The box diagram shown, for example, might be generated by the following statements:
|
Figure 5-12. The GVariable class implemented using GCompound
/* Class: GVariable */
/**
 * This class represents a labeled box with contents that can be
 * set and retrieved by the client.  It is intended for displaying
 * the value of a variable.
 */

class GVariable extends GCompound {

   public static final double VARIABLE_WIDTH = 75;
   public static final double VARIABLE_HEIGHT = 25;
   public static final Font FONT = new Font("Monospaced",
                                            Font.BOLD, 10);

/** Constructs a GVariable object with the specified name. */
   public GVariable(String name) {
      GRect box = new GRect(VARIABLE_WIDTH, VARIABLE_HEIGHT);
      box.setFilled(true);
      box.setFillColor(Color.white);
      add(box);
      GLabel label = new GLabel(name);
      label.setFont(FONT);
      label.setLocation(0, -label.getDescent() - 1);
      add(label);
      contents = new GLabel("");
      contents.setFont(FONT);
      add(contents);
      centerContents();
      markAsComplete();
   }

/** Sets the value of the variable. */
   public void setValue(Object value) {
      this.value = value;
      contents.setLabel(value.toString());
      centerContents();
   }

/** Returns the value of the variable. */
   public Object getValue() {
      return value;
   }

/** Centers the contents string in the variable box. */
   private void centerContents() {
      double x = (VARIABLE_WIDTH - contents.getWidth()) / 2;
      double y = (VARIABLE_HEIGHT + contents.getAscent()) / 2;
      contents.setLocation(x, y);
   }

/* Private instance variables */
   private GLabel label, contents;
   private Object value;
} |
The strategies presented earlier all have the advantage—particularly for novices—that they allow subclass designers to remain entirely in the acm.graphics world, without exposing the implementation structures underneath. It is also possible to extend GObject directly. In this case, however, the subclass must provide a definition of the method
|
which means that whoever writes that subclass has to understand
To offer at least one example of how such extensions might work, the code in Figure 5-13 reimplements the GVariable example from the preceding section as a direct subclass of GObject. Much of the code is the same. The difference is that the painting of the object (including the centering of the value string) is now supplied by an explicit paint method. For Java programmers, the resulting code is not too difficult. The class definition still fits on one page, and the implementation of paint is reasonably straightforward. For a novice, however, this implementation requires coming to understand several new concepts, including the classes Graphics and FontMetrics; the code based on GCompound hides these implementation details.
Figure 5-13. The GVariable class implemented as a direct GObject subclass
/* Class: GVariable */
/**
 * This class represents a labeled box with contents that can be
 * set and retrieved by the client.  It is intended for displaying
 * the value of a variable.
 */

class GVariable extends GObject {

   public static final double VARIABLE_WIDTH = 75;
   public static final double VARIABLE_HEIGHT = 25;
   public static final Font FONT = new Font("Monospaced",
                                            Font.BOLD, 10);

/** Constructs a GVariable object with the specified name. */
   public GVariable(String name) {
      setSize(VARIABLE_WIDTH, VARIABLE_HEIGHT);
      this.name = name;
      value = null;
   }

/** Sets the value of the variable. */
   public void setValue(Object value) {
      this.value = value;
      repaint();
   }

/** Returns the value of the variable. */
   public Object getValue() {
      return value;
   }

/** Draws the object using the graphics context g. */
   public void paint(Graphics g) {
      Rectangle r = getBounds().toRectangle();
      g.setColor(Color.white);
      g.fillRect(r.x, r.y, r.width, r.height);
      g.setColor(getColor());
      g.drawRect(r.x, r.y, r.width, r.height);
      g.setFont(FONT);
      FontMetrics fm = g.getFontMetrics();
      g.drawString(name, r.x, r.y - fm.getDescent() - 1);
      String str = (value == null) ? "" : value.toString();
      int x = r.x + (r.width - fm.stringWidth(str)) / 2;
      int y = r.y + (r.height + fm.getAscent()) / 2;
      g.drawString(str, x, y);
   }

/* Private instance variables */
   private String name;
   private Object value;
} |
The existence of any strategy for defining new GObject subclasses, whether or not a GCompound class exists, invites adopters of the package to create new classes, some of which will undoubtedly be of interest to the broader community. One of the lessons of the extensible language movements of the 1970s—and indeed one of the underlying reasons for the success of very rich software development environments like the JDK—is that programmers are generally less concerned with extensibility than they are with extensions. Being able to build your own extensions is of interest to some; picking up extensions that someone else has developed is of great interest to a much broader spectrum of users. It therefore seems reasonable to expect that educators (and possibly others) who adopt the acm.graphics package will be willing both to supply new GObject classes to a common repository and to make use of ones that others put there.
Understanding how to manage such a repository needs to be part of the follow-on work envisioned by the Java Task Force. Presumably, it would make sense to establish some vetting process by which submissions could be evaluated and checked for consistency. Those that pass muster—and that come with a required set of materials including a javadoc description and source code distributable under some form of open source license—could then be put into a repository somewhere. Such a repository would increase community buy-in to the ACM libraries generally and make available an array of tools beyond anything that the Task Force itself could undertake to do.
At the same time, it seems important that the extended classes in the repository not become part of the acm.graphics package but remain as compatible supplements to it. Trying to manage a series of staged releases to accommodate new community-supplied classes seems like a fool’s errand and would reintroduce the instability that has plagued Java itself. As long as they stay within the 18 classes defined in the acm.graphics package, textbook authors and other resource developers can feel confident that the materials they develop will not quickly become dated. Similarly, teachers will not have to worry that the curricular materials they develop during one year might become obsolete in the next.
The remaining two classes in the acm.graphics package are the GPen and GTurtle classes, which don’t really fit into the other categories. Their purpose is to provide students with a simple mechanism for drawing figures using a paradigm that is more aligned with the pen-on-paper model that the felt-board model used in the rest of the package. The two models, however, are integrated in the sense that GPen and GTurtle keep track of their own path and can therefore respond to any repaint requests, just as the other graphical object classes do.
The GPen class models a pen that remembers its current location on the GCanvas on which it is installed. The most important methods for GPen are setLocation (or move to specify relative motion) and drawLine. The former corresponds to picking up the pen and moving it to a new location; the latter represents motion with the pen against the canvas, thereby drawing a line. Each subsequent line begins where the last one ended, which makes it very easy to draw connected figures. The GPen object also remembers the path it has drawn, making it possible to redraw the path when repaint requests occur. The full set of methods for the GPen class is shown in Figure 5-14.
Figure 5-14. Public methods in the GPen class
| |||||||||||||||||||||||||||||||||
The graphics model provided by the GPen class provides a straightforward mechanism for generating a variety of recursive figures, such as the Koch fractal (“snowflake” curve) or the Sierpinski triangle. The following code, for example, uses the GPen class to draw a Koch fractal of the indicated order and size (horizontal extent) with its geometric center at the point (x, y):
|
Calling drawKochFractal(cx, cy, 100, 3) (where cx and cy are the coordinates of the center of the figure) generates the following picture:
 |
The applet that produces this figure is available on the JTF web site.
Both the GPen class and the GTurtle class described in the following section are often used to create animated displays. To provide clients with some control over the speed of the animation, both classes include a setSpeed method, which takes a number between 0.0 and 1.0 as its argument. Calling setSpeed(0.0) means that the animation crawls along at a very slow pace; calling setSpeed(1.0) makes it proceed as fast as the system allows. Intermediate values are interpreted so as to provide a smoothly varying speed of operation. Thus, if the speed value is associated with a scrollbar whose ends represent the values 0.0 and 1.0, adjusting the scrollbar will cause the animation to speed up or slow down in a way that seems reasonably natural to users.
The speed mechanism is implemented by delaying the calling thread each time the GPen or GTurtle object is moved. If that calling thread is Java’s event-handling thread, any other user-generated events will be held up during the period in which that thread is delayed. Given that the delays are relatively short even on the slowest speed, this implementation does not usually cause problems for novices writing animations. More sophisticated users, however, should create a separate thread to animate these objects.
The GTurtle class is similar to GPen but uses a “turtle graphics” model derived from the Project Logo turtle described in Seymour Papert’s Mindstorms
Figure 5-15. Public methods in the GTurtle class
| |||||||||||||||||||||||||||||
Although GTurtle and GPen have similar capabilities, they are likely to be used in different ways. The GTurtle class is designed to be used at the very beginning of a course and must be both simple and evocative as intuitive model. The GTurtle therefore has somewhat different defaults than its GPen counterpart does. The image of the GTurtle, for example, is initially visible, while the GPen image is hidden. Moreover, the GTurtle does not actually draw lines until the pen is lowered. The GPen offers no option; the pen is always down. These defaults make the GTurtle consistent with the Logo model, in which students move the turtle first and then start drawing pictures with it.
The turtle graphics model is illustrated in section 6.8, which also describes how to use objects of the GTurtle classes as standalone programs.

|
Final Report—July 31, 2006 |

|