|
JTF > Tutorial > Using the acm.graphics Package |
The HelloGraphics example in Chapter 1 offers a simple example of how to write graphical programs, but does not explain the details behind the methods it contains. The purpose of this chapter is to give you a working knowledge of the facilities available in the acm.graphics package and how to use them effectively.
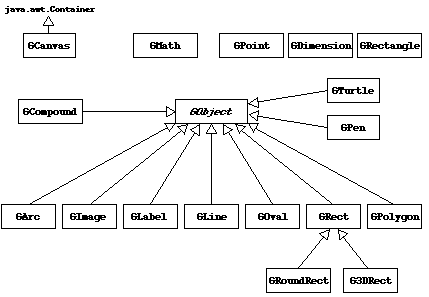
The class structure of acm.graphics package appears in Figure 2-1. Most of the classes in the package are subclasses of the abstract class GObject at the center of the diagram. Conceptually, GObject represents the universal class of graphical objects that can be displayed. When you use acm.graphics, you assemble a picture by constructing various
Figure 2-1. Class diagram for the acm.graphics package
 |
When you create a picture using the acm.graphics package, you do so by arranging graphical objects at various positions on a background called a canvas. The underlying model is similar to that of a collage in which an artist creates a composition by taking various objects and assembling them on a background canvas. In the world of the collage artist, those objects might be geometrical shapes, words clipped from newspapers, lines formed from bits of string, or images taken from magazines. In the acm.graphics package, there are counterparts for each of these graphical objects.
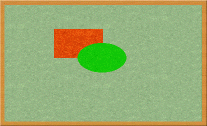
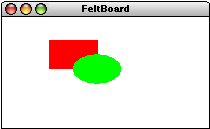
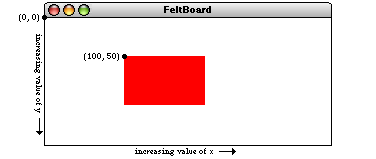
Another metaphor that often helps students understand the conceptual model of the acm.graphics package is that of a felt board—the sort one might find in an elementary school classroom. A child creates pictures by taking shapes of colored felt and sticking them onto a large felt board that serves as the background canvas for the picture as a whole. The pieces stay where the child puts them because felt fibers interlock tightly enough for the pieces to stick together. The left side of Figure 2-2 shows a physical felt board with a red rectangle and a green oval attached. The right side of the figure is the virtual equivalent in the acm.graphics world. To create the picture, you would need to create two graphical objects—a red rectangle and a green oval—and add them to the graphical canvas that forms the background.
Figure 2-2. Physical felt board and its virtual equivalent
|
The code for the FeltBoard example appears in Figure 2-3. Even though you have not yet had a chance to learn the details of the various classes and methods used in the program, the overall framework should nonetheless make sense. The program first creates a rectangle, indicates that it should be filled rather than outlined, colors it red, and adds it to the canvas. It then uses almost the same operations to add a green oval. Because the oval is added after the rectangle, it appears to be in front, obscuring part of the rectangle underneath. This behavior, of course, is exactly what would happen with the physical felt board. Moreover, if you were to take the oval away by calling
|
the parts of the underlying rectangle that had previously been obscured would reappear.
In this tutorial, the order in which objects are layered on the canvas will be called the stacking order. (In more mathematical descriptions, this ordering is often called z-ordering, because the z-axis is the one that projects outward from the screen.) Whenever a new object is added to a canvas, it appears at the front of the stack. Graphical objects are always drawn from back to front so that the frontmost objects overwrite those that are further back.
Figure 2-3. Code for the felt board example [applet]
/*
 * File: FeltBoard.java
 * --------------------
 * This program offers a simple example of the acm.graphics package
 * that draws a red rectangle and a green oval.  The dimensions of
 * the rectangle are chosen so that its sides are in proportion to
 * the "golden ratio" thought by the Greeks to represent the most
 * aesthetically pleasing geometry.
 */

import acm.program.*;
import acm.graphics.*;
import java.awt.*;

public class FeltBoard extends GraphicsProgram {

/** Runs the program */
   public void run() {
      GRect rect = new GRect(100, 50, 100, 100 / PHI);
      rect.setFilled(true);
      rect.setColor(Color.RED);
      add(rect);
      GOval oval = new GOval(150, 50 + 50 / PHI, 100, 100 / PHI);
      oval.setFilled(true);
      oval.setColor(Color.GREEN);
      add(oval);
   }

/** Constant representing the golden ratio */
   public static final double PHI = 1.618;

} |
The acm.graphics package uses the same basic coordinate system that traditional Java programs do. Coordinate values are expressed in terms of pixels, which are the individual dots that cover the face of the screen. Each pixel in a graphics window is identified by its x and y coordinates, with x values increasing as you move rightward across the window and y values increasing as you move down from the top. The point (0, 0)—which is called the origin—is in the upper left corner of the window. This coordinate system is illustrated by the diagram in Figure 2-4, which shows only the red rectangle from the FeltBoard.java program. The location of that rectangle is (100, 50), which means that its upper left corner is 100 pixels to the right and 50 pixels down from the origin of the graphics window.
Figure 2-4. The Java coordinate system
 |
The only difference between the coordinate systems used in the acm.graphics package and Java’s Graphics class is that the acm.graphics package uses
|
In the integer-based Java model, it would be necessary to include explicit code to convert the height parameter to an int. In addition to adding complexity to the code, forcing students to convert coordinates to integers can introduce rounding errors that distort the geometry of the displayed figures.
Judging from the experience of the instructors who tested the acm.graphics package while it was in development, the change from
Although it is usually possible to specify individual values for coordinate values, it is often convenient to encapsulate an x and a y coordinate as a point, a width and a height value as a composite indication of the dimensions of an object, or all four values as the bounding rectangle for a figure. Because the coordinates are stored as
As an example, the declaration
|
introduces the variable goldenSize and initializes it to a GDimension object whose internal width and height fields are the dimensions of the golden rectangle illustrated in the earlier example. The advantage of encapsulating these values into objects is that they can then be passed from one method to another using a single variable.
Computing the coordinates of a graphical design can sometimes require the use of simple trigonometric functions. Although functions like sin and cos are defined in Java’s standard Math class, students find them confusing in graphical applications because of inconsistencies in the way angles are represented. In Java’s graphics libraries, angles are measured in degrees; in the Math class, angles must be given in radians. To minimize the confusion associated with this inconsistency of representation, the acm.graphics package includes a class called GMath, which exports the methods shown in Figure 2-5. Most of these methods are simply degree-based versions of the standard trigonometric functions, but the distance, angle, and round methods are also worth noting.
Figure 2-5. Static methods in the GMath class
| |||||||||||||||||||||
In the acm.graphics model, pictures are created by adding graphical objects—each of which is an instance of the GObject class hierarchy described in section 2.3—to a background canvas. That background—the analogue of the felt board in the physical world—is provided by the GCanvas class. The GCanvas class is a lightweight component and can be added to any Java container in either the java.awt or javax.swing packages, which makes it possible to use the graphics facilities in any Java application. For the most part, however, students in introductory courses won’t use the GCanvas class directly but will instead use the GraphicsProgram class, which automatically creates a GCanvas and installs it in the program window, as illustrated in several preceding examples. The GraphicsProgram class forwards operations such as add and remove to the embedded GCanvas so that students don’t need to be aware of the underlying implementation details.
The most important methods supported by the GCanvas class are shown in Figure 2-6. Many of these methods are concerned with adding and removing graphical objects. These methods are easy to understand, particularly if you keep in mind that a GCanvas is conceptually a container for GObject values. The container metaphor explains the functionality provided by the add, remove, and removeAll methods in Figure 2-6, which are analogous to the identically named methods in JComponent and Container.
Figure 2-6. Useful methods in the GCanvas class
| |||||||||||||||||||||||||
The add method comes in two forms, one that preserves the internal location of the graphical object and one that takes an explicit x and y coordinate. Each method has its uses, and it is convenient to have both available. The first is useful particularly when the constructor for the GObject specifies the location, as it does, for example, in the case of the GRect class. If you wanted to create a 100 x 60 rectangle at the point (75, 50), you could do so by writing the following statement:
|
The second form is particularly useful when you want to choose the coordinates of the object in a way that depends on other properties of the object. For example, the following code taken from the HelloGraphics example in Chapter 1 centers a GLabel object in the window:
|
Because the placement of the label depends on its dimensions, it is necessary to create the label first and then add it to a particular location on the canvas.
The GCanvas method getElement(x, y) returns the graphical object on the canvas that includes the point (x, y). If there is more than one such object, getElement returns the one that is in front of the others in the stacking order; if there is no object at that position, getElement returns null. This method is useful, for example, if you need to select an object using the mouse. Chapter 3 includes several examples of this technique.
Several of the most useful methods in the GCanvas class are those that are inherited from its superclasses in Java’s component hierarchy. For example, if you need to determine how big the graphical canvas is, you can call the methods getWidth and getHeight. Thus, if you wanted to define a GPoint variable to mark the center of the canvas, you could do so with the following declaration:
|
You can also change the background color by calling setBackground(bg), where bg is the new background color for the canvas.
The GObject class represents the universe of graphical objects that can be displayed on a GCanvas. The GObject class itself is abstract, which means that programs never create instances of the GObject class directly. Instead, programs create instances of one of the GObject subclasses that represent specific graphical objects such as rectangles, ovals, and lines. The most important such classes are the ones that appear at the bottom of the class diagram from Figure 2-1, which are collectively called the shape classes. The shape classes are described in detail in section 2.4. Before going into those details, however, it makes sense to begin by describing the characteristics that are common to the GObject class as a whole.
All
Figure 2-7. Useful methods common to all graphical objects
| |||||||||||||||||||||||||||||||||||
The first several methods in Figure 2-7 make it possible to determine the location and size of any GObject. The getX, getY, getWidth, and getHeight methods return these coordinate values individually, and the getLocation, getSize, and getBounds methods return composite values that encapsulate that information in a single object, as described in section 2.1.
The next three methods in Figure 2-7 offer several techniques for changing the location of a graphical object. The setLocation(x, y) method sets the location to an absolute coordinate position on the screen. For example, in the FeltBoard example, executing the statement
|
would move the rectangle to the origin in the upper left corner of the window.
The move(dx, dy) method, by contrast, makes it possible to move an object relative to its current location. The effect of this call is to shift the location of the object by a specified number of pixels along each coordinate axis. For example, the statement
|
would move the oval 10 pixels to the right. The dx and dy values can be negative. Calling
|
would move the rectangle 25 pixels upward.
The movePolar(r, theta) method is useful in applications in which you need to move a graphical object in a particular direction. The name of the method comes from the concept of polar coordinates in mathematics, in which a displacement is defined by a distance r and an angle theta. Just as it is in traditional geometry, the angle theta is measured in degrees counterclockwise from the +x axis. Thus, the statement
|
would move the rectangle 10 pixels along a line in the 45° direction, which is northeast.
The acm.graphics package does not define its own notion of color but instead relies on the Color class in the standard java.awt package. The predefined colors are:
| Color.BLACK Color.DARK_GRAY Color.GRAY Color.LIGHT_GRAY Color.WHITE | Color.RED Color.YELLOW Color.GREEN Color.CYAN | Color.BLUE Color.MAGENTA Color.ORANGE Color.PINK |
It is also possible to create additional colors using the constructors in the Color class. In either case, you need to include the import line
|
at the beginning of your program.
The setColor method sets the color of the graphical object to the specified value; the corresponding getColor method allows you to determine what color that object currently is. This facility allows you to make a temporary change to the color of a graphical object using code that looks something like this:
|
Figure 2-7 also lists a set of methods that make it possible to control the stacking order. The sendToFront and sendToBack methods move the object to the front or back of the stack, respectively. The sendForward and sendBackward methods move the object one step forward or backward in the stack so that it jumps ahead of or behind the adjacent object in the stack. Changing the stacking order also redraws the display to ensure that underlying objects are correctly redrawn.
For example, if you add the statement
|
to the end of the FeltBoard program, the picture on the display would change as follows:
 |
In many applications—particularly those that involve interactivity of the sort that you will see in Chapter 3—it is useful to be able to tell whether a graphical object contains a particular point. This facility is provided by the contains(x, y) method, which returns true if the point (x, y) is inside the figure. For example, given a standard Java MouseEvent e, you can determine whether the mouse is inside the rectangle rect using the following if statement:
|
Even though every GObject subclass has a contains method, the precise definition of what it means for a point to be “inside” the object differs depending on the class. In the case of a GOval, for example, a point is considered to be inside the oval only if it is mathematically contained within the elliptical shape that the GOval draws. Points that are inside the bounding rectangle but outside of the oval are considered to be “outside.” Thus, it is important to keep in mind that
|
and
|
do not necessarily return the same answer.
You have probably noticed that several of the examples you’ve already seen in this tutorial include methods that do not appear in the list in Figure 2-7. For example, the FeltBoard program includes calls to a setFilled method to mark the rectangle and oval as filled rather than outlined. Looking at Figure 2-7, it appears that the GObject class does not include a setFilled method, which is indeed the case.
As the caption for Figure 2-7 makes clear, the methods listed in that table are the ones that are common to every GObject subclass. While it is always possible to set the location of a graphical object, it is only possible to fill that object if the idea of “filling” makes sense for that class. Filling is easily defined for geometrical shapes such as ovals, rectangles, polygons, and arcs, but it is not clear what it might mean to fill a line, an image, or a label. Since there are subclasses that cannot give a meaningful interpretation to setFilled, that method is not defined at the GObject level but is instead implemented only for those subclasses for which filling is defined.
At the same time, it is important to define the setFilled method so that it works the same way for any class that implements it. If setFilled, for example, worked differently in the GRect and GOval classes, trying to keep track of the different styles would inevitably cause confusion. To ensure that the model for filled shapes remains consistent, the methods that support filling are defined in an interface called GFillable, which specifies the behavior of any fillable object. In addition to the setFilled method that you have already seen, the GFillable interface defines an isFilled method that tests whether the object is filled, a setFillColor method to set the color of the interior of the object, and a getFillColor method that retrieves the interior fill color. The setFillColor method makes it possible to set the color of an object’s interior independently from the color of its border. For example, if you changed the code from the FeltBoard example so that the statements generating the rectangle were
|
you would see a rectangle whose border was red and whose interior was magenta.
In addition to the GFillable interface, the acm.graphics package includes two interfaces that make it possible to change the size of an object. Classes in which the dimensions are defined by a bounding rectangle—GRect, GOval, and GImage—implement the GResizable interface, which allows you to change the size of a resizable object gobj by calling
|
A much larger set of classes implements the GScalable interface, which makes it possible to change the size of an object by multiplying its width and height by a scaling factor. In the common case in which you want to scale an object equally in both dimensions, you can call
|
which multiplies the width and height by sf. For example, you could double the size of a scalable object by calling
|
The scale method has a two-argument form that allows you to scale a figure independently in the x and y directions. The statement
|
leaves the width of the object unchanged but halves its height.
The methods specified by the GFillable, GResizable, and GScalable interfaces are summarized in Figure 2-8.
Figure 2-8. Methods defined by interfaces
| ||||||||||||||||||||||
So far, this tutorial has looked only at methods that apply to all
As you go through the descriptions of the individual shape classes, you are likely to conclude that some of them are designed in ways that are less than ideal for introductory students. In the abstract, this conclusion is almost certainly correct. For practical reasons that look beyond the introductory course, the Java Task Force decided to implement the shape classes so that they match their counterparts in Java’s standard Graphics class. In particular, the set of shape classes corresponds precisely to the facilities that the Graphics class offers for drawing geometrical shapes, text strings, and images. Moreover, the constructors for each class take the same parameters and have the same semantics as the corresponding method in the Graphics class. Thus, the GArc constructor—which is arguably the most counterintuitive in many ways—has the structure it does, not because we thought that structure was perfect, but because that is the structure used by the drawArc method in the Graphics class. By keeping the semantics consistent with its Java counterpart, the acm.graphics package makes it easier for students to move on to the standard packages as they learn more about programming.
The simplest and most intuitive of the shape classes is the GRect class, which represents a rectangular box. This class implements the GFillable, GResizable, and GScalable interfaces, but otherwise includes no other methods except its constructor, which comes in two forms. The most common form of the constructor is
|
which defines both the location and size of the GRect. The second form of the constructor is
|
which defines a rectangle of the specified size whose upper left corner is at the origin. If you use this second form, you will typically add the GRect to the canvas at a specific (x, y) location as discussed in section 2.2.
You have already seen one example of the use of the GRect class in the simple FeltBoard example. A more substantive example is the Checkerboard program in Figure 2-9, which draws a checkerboard that looks like this:
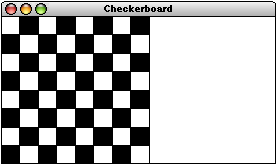 |
Figure 2-9. Code for the checkerboard example [applet]
/*
 * File: Checkerboard.java
 * -----------------------
 * This program draws a checkerboard.  The dimensions of the
 * checkerboard is specified by the constants NROWS and
 * NCOLUMNS, and the size of the squares is chosen so
 * that the checkerboard fills the available vertical space.
 */

import acm.program.*;
import acm.graphics.*;

public class Checkerboard extends GraphicsProgram {

/** Runs the program */
   public void run() {
      double sqSize = (double) getHeight() / NROWS;
      for (int i = 0; i < NROWS; i++) {
         for (int j = 0; j < NCOLUMNS; j++) {
            double x = j * sqSize;
            double y = i * sqSize;
            GRect sq = new GRect(x, y, sqSize, sqSize);
            sq.setFilled((i + j) % 2 != 0);
            add(sq);
         }
      }
   }

/* Private constants */
   private static final int NROWS = 8;     /* Number of rows    */
   private static final int NCOLUMNS = 8;  /* Number of columns */

} |
As you can see from the diagram of the graphics class hierarchy in Figure 2-1, the GRect class has two subclasses—GRoundRect and G3DRect—that define shapes that are essentially rectangles but differ slightly in the way they are drawn on the screen. The GRoundRect class has rounded corners, and the G3DRect class has beveled edges that can be shadowed to make it appear raised or lowered. These classes extend GRect to change their visual appearance and to export additional method definitions that make it possible to adjust the properties of one of these objects. For GRoundRect, these properties specify the corner curvature; for G3DRect, the additional methods allow the client to indicate whether the rectangle should appear raised or lowered. Neither of these classes are used much in practice, but they are included in acm.graphics to ensure that it can support the full functionality of Java’s Graphics class, which includes analogues for both.
The GLine class is used to display a straight line on the display. The standard GLine constructor takes the x and y coordinates of each end point. For example, to draw a line that extends diagonally from the origin of the canvas in the upper left to the opposite corner in the lower right, you could use the following code:
|
On the whole, the GLine class makes intuitive sense. There are, however, a few points that are worth remembering:
Even though the GLine class is conceptually simple, you can nonetheless create wonderfully compelling pictures with it. Figure 2-10, for example, shows a drawing made up entirely of GLine objects. The program to create this figure—which simulates the process of stringing colored yarn through a series of equally spaced pegs around the border—appears in Figure 2-11.
Figure 2-10. Pattern created by looping yarn around pegs spaced equally along the border [applet]
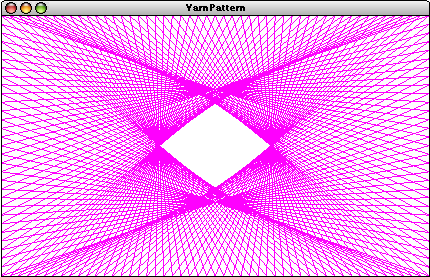 |
Figure 2-11. Code to generate the yarn pattern in Figure 2-10
/*
 * File: YarnPattern.java
 * ----------------------
 * This program illustrates the use of the GLine class to simulate
 * winding a piece of colored yarn around a set of pegs equally
 * spaced along the edges of the canvas.  At each step, the yarn is
 * stretched from its current peg to the one DELTA pegs further on.
 */

import acm.graphics.*;
import acm.program.*;
import java.awt.*;
import java.util.*;

public class YarnPattern extends GraphicsProgram {

/** Runs the program */
   public void run() {
      ArrayList pegs = createPegList();
      int thisPeg = 0;
      int nextPeg = -1;
      while (thisPeg != 0 || nextPeg == -1) {
         nextPeg = (thisPeg + DELTA) % pegs.size();
         GPoint p0 = (GPoint) pegs.get(thisPeg);
         GPoint p1 = (GPoint) pegs.get(nextPeg);
         GLine line = new GLine(p0.getX(), p0.getY(),
                                p1.getX(), p1.getY());
         line.setColor(Color.MAGENTA);
         add(line);
         thisPeg = nextPeg;
      }
   }

/* Create an array list containing the locations of the pegs */
   private ArrayList createPegList() {
      ArrayList pegs = new ArrayList();
      for (int i = 0; i < N_ACROSS; i++) {
         pegs.add(new GPoint(i * PEG_SEP, 0));
      }
      for (int i = 0; i < N_DOWN; i++) {
         pegs.add(new GPoint(N_ACROSS * PEG_SEP, i * PEG_SEP));
      }
      for (int i = N_ACROSS; i > 0; i--) {
         pegs.add(new GPoint(i * PEG_SEP, N_DOWN * PEG_SEP));
      }
      for (int i = N_DOWN; i > 0; i--) {
         pegs.add(new GPoint(0, i * PEG_SEP));
      }
      return pegs;
   }

/* Private constants */
   private static final int N_ACROSS = 50;
   private static final int N_DOWN = 30;
   private static final int PEG_SEP = 10;
   private static final int DELTA = 67;

} |
The GArc class—which is used to display elliptical arcs on the canvas—has proven to be somewhat more confusing to novices than the other shape classes in the acm.graphics package. As noted in the introduction to section 2.4, the Java Task Force chose to implement the GArc class so that its operation was consistent with the drawArc and fillArc methods in the standard Graphics class. This strategy has the advantage of making it easier for students to make the eventual transition to the standard tools at a cost of exposing some of Java’s complexity earlier.
The GArc constructor takes six parameters: x, y, width, height, start, and sweep. The first four define a bounding rectangle exactly as they do for the GOval class. The start and sweep parameters—each of which is measured in degrees counterclockwise from the +x axis just as angles are in traditional geometry—indicate the angle at which the arc begins and how far it extends, respectively.
To get a sense of how these parameters work, it is easiest to look at a simple example, such as the following:
|
The first three lines define the size of the bounding rectangle and calculate the x and y coordinates at its upper left corner. The constructor call itself then includes the dimensions of that rectangle along with a start parameter of 45 and a sweep parameter of 270. Together, these parameters define an arc that begins at 45° and then extends through 270° in the counterclockwise direction. The interpretation of these parameters is illustrated on the left side of Figure 2-12.
Figure 2-12. The geometry of the GArc class
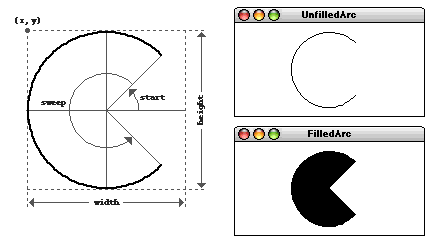 |
The two sample runs at the right of Figure 2-12 show how the arc appears on the canvas. The code example from the preceding paragraph creates an unfilled arc as shown in the upper diagram. The lower diagram shows what happens if you were to call
|
In Java, a filled arc is drawn by connecting the endpoints of the arc to the center of the circle and the filling the interior. The result is a wedge shape of the sort you would find in a pie chart (or, as shown in the diagram, a Pac-Man game).
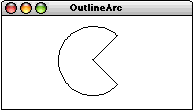
Java’s interpretation of what it means to fill an arc can cause confusion because the unfilled arc does not include the complete outline of its filled counterpart. You can create the outline of the wedge by filling the GArc and then setting its fill color to match the background. Thus, if you were to add the line
|
you would see a figure like this:
 |
Java’s interpretation of filling also has implications for the semantics of the contains method. For an unfilled arc, containment implies that the arc point is actually on the arc, subject to the same interpretation of “closeness” as described for lines in the preceding section. For a filled arc, containment implies inclusion in the wedge. This definition of containment is necessary to ensure that mouse events are transmitted to the arc in a way that matches the user’s intuition.
If the width and height parameters in the GArc constructor are different, the arc will be elliptical rather than circular. When this occurs, the arc segment is tsthe bounding rectangle, just as you would expect. The confusing thing is that the angles are always interpreted as if the arc were scaled to be circular. For example, if you were to increase the window size and then call
|
you would get the following elongated arc, which is five times as wide as it is high:
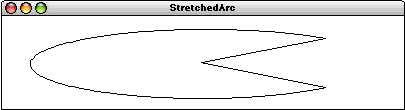 |
In this figure, the start and sweep angles are still defined to be 45° and 270°, even though the missing wedge at the right is now clearly smaller than the 90° angle that appears in the unscaled figure.
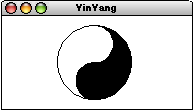
Figure 2-13 offers a more substantive example of the use of arcs by generating the background curve for the Taoist yin-yang symbol:
Figure 2-13. Code to create a yin-yang figure using arcs [applet]
/*
 * File: YinYang.java
 * ------------------
 * This program draws the Taoist yin-yang symbol at the center of
 * the graphics window.  The height and width of the entire figure
 * are both specified by the constant FIGURE_SIZE.
 */

import acm.graphics.*;
import acm.program.*;
import java.awt.*;

public class YinYang extends GraphicsProgram {

/** Runs the program */
   public void run() {
      double x = getWidth() / 2;
      double y = getHeight() / 2;
      double r = FIGURE_SIZE / 2;
      GArc bigBlack = new GArc(x - r, y - r, 2 * r, 2 * r, -90, 180);
      bigBlack.setFilled(true);
      add(bigBlack);
      GArc smallWhite = new GArc(x - r / 2, y - r, r, r, -90, 180);
      smallWhite.setFilled(true);
      smallWhite.setColor(Color.WHITE);
      add(smallWhite);
      GArc smallBlack = new GArc(x - r / 2, y, r, r, 90, 180);
      smallBlack.setFilled(true);
      add(smallBlack);
      GArc outerCircle = new GArc(x - r, y - r, 2 * r, 2 * r, 0, 360);
      add(outerCircle);
   }

/* Private constants */
   private static final double FIGURE_SIZE = 150;

} |
 |
The GLabel class is used to display text strings on the canvas. The GLabel class is different from the other shape classes because the operations one wants to perform on strings are different from those that are appropriate for geometrical figures. As a result, the GLabel class implements none of the standard GFillable, GResizable, and GScalable interfaces but instead has its own collection of methods, as shown in Figure 2-14. Despite the many differences, however, it is useful to include GLabel in the graphics hierarchy so that it is possible to mix geometric figures and text on the canvas.
Figure 2-14. Useful methods in the GLabel class
| ||||||||||||||||||||
Despite its lack of symmetry with the other shape classes, the GLabel class is easy to understand once you figure out the terminology used to define its geometry. The most important thing to realize is that the position of a GLabel is not defined by the upper left corner, but by the starting point of the baseline, which is the imaginary line on which the characters sit. The origin and baseline properties of the GLabel class are illustrated in the following diagram:
 |
Given that the GLabel class does not implement either the GResizable or the GScalable interface, the only way to change the size of a GLabel is to change its font. The setFont method takes a standard Java Font object, but is overloaded so that it can also accept a string describing the font. That string is interpreted in the manner specified by Font.decode and consists of three parts—the font family, the style, and the point size—separated by hyphens. Thus, to set the font of a variable named title to be an 18-point, boldface, sans-serif font, you can simply write
|
When given a string as its argument, the setFont method interprets an asterisk in any of these positions as signifying the previous value. Thus, you can set the style of a label to italic without changing its family or size by writing
|
Several of the methods in Figure 2-14 are included to assist in the process of positioning the GLabel. The most important methods for controlling the position, however, are not specific to the GLabel class but are simply the getWidth and getHeight methods inherited from GObject. As they do for all graphical objects, these methods return the dimensions of the rectangle that bounds the figure. The getWidth method returns the horizontal extent of the label and will change if you change either the font or the internal string. The getHeight method returns the height of a single line of text in the current font, which is defined to be the distance between the baselines of successive lines. The getAscent and getDescent methods return the maximum distance the current font extends above and below the baseline, respectively.
Now that you know about these methods, you are finally in a position to understand the details of how the code in the HelloGraphics example from Chapter 1 centers the label on the canvas. The relevant lines look like this:
|
The calculation of the x coordinate moves rightward half the width of the canvas as a whole, but subtracts away half the width of the GLabel to reach its origin point. The calculation of the y coordinate is similar, but this time the offset is half the distance the font extends above the baseline, which is given by getAscent. The plus sign in the calculation of the y coordinate value may initially seem confusing, but the confusion disappears when you remember that y values increase as you move down the screen.
If you work with a lot of text on the canvas, you will probably discover at some point that the strategy of using getAscent to center a GLabel vertically doesn’t quite work. Most labels that you display on the canvas will appear to be a few pixels too low. The reason for this behavior is that getAscent returns the maximum ascent of the font and not the distance the text of this particular label happens to rise above the baseline. For most fonts, the parentheses and diacritical marks extend above the tops of the uppercase letters and therefore make the font ascent larger than it seems to be in practice. If you are a stickler for aesthetics, you may need to adjust the vertical centering by a pixel or two to have things look precisely right.
The GImage class is used to display an image on the canvas. That image must be presented in one of the standard formats for image data, of which the most common are the GIF (Graphics Interchange Format) and JPEG (Joint Photographic Experts Group) formats. To create an image, you will need to use an image processing tool (such as Adobe Photoshop�) or download the image from the web. Unless they are specifically marked as being in public domain, images you find on the web are usually subject to copyright protection, which means that you must ensure that any use you make of those images fits under the standard “fair use” guidelines.
Once you have created the image file, you need to put it in a place where your Java application can find it. The standard GImage constructor takes the name of the image and then looks for the image data in the following places:
If the image is found in any of those places, it is loaded automatically to create a Java Image object. If none of these places contains the image, the GImage constructor generates a runtime error. A more extensive discussion of the search strategy for images appears in the documentation for the MediaTools class in the acm.util package.
To offer a simple example, suppose that you wanted to display the logo for the Java Task Force in the center of a GraphicsProgram canvas. The first step would be to download the JTFLogo.gif file from our web site and store it on your own machine, either in the directory that contains the program or in a images subdirectory. You can then create the image and add it to the window like this:
|
This code generates the following display:
 |
The GImage class implements both the GResizable and GScalable interfaces, but not GFillable. Scaling and resizing of images is performed automatically by Java’s image-handling libraries. For example, you could stretch and recenter the logo by issuing the commands
|
which would change the display to
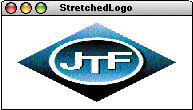 |
The shape that represents the greatest deviation from the traditional Java model is the GPolygon class, which is used to draw closed polygonal shapes. Unlike the other shape classes, the constructor for the GPolygon does not create a fully formed object but instead creates a polygon with no vertices. Starting with that empty polygon, you can then add additional vertices using any of three different methods—addVertex, addEdge, and addPolarEdge—that are defined as part of the GPolygon class.
These methods are easiest to illustrate by example. Before doing so, however, it is important to note that the coordinates of each vertex are not expressed in the global coordinate space of the canvas but are instead defined in relation to a point chosen to represent the origin of the polygon. The origin need not be one of the vertices and is typically chosen to be the center, particularly for regular polygonal shapes. Setting the location of a GPolygon corresponds to specifying the location of its origin, and the polygon is then drawn relative to that point. The advantage of this strategy is that moving a polygon requires changing the coordinates of just one point and does not require adjusting the coordinates of each vertex.
The simplest method to explain is addVertex(x, y), which adds a vertex at the point (x, y) relative to the location of the polygon. Suppose, for example, that you wanted to draw a diamond shape, 80 pixels high and 60 pixels wide, that looks like this:
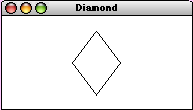 |
You can define the diamond GPolygon relative to its center using the following code:
|
If you then wanted to position the diamond in the center of the window as it appears in the example, you could add it to the canvas with the line
|
The diamond is then drawn so that its center is at the center of the canvas a whole. Each of the vertices is expressed relative to that point.
The addEdge(dx, dy) method is similar to addVertex, except that the parameters specify the displacement from the previous vertex to the current one. You could therefore create the same diamond by making the following sequence of calls:
|
Note that the first vertex must still be added using addVertex, but that subsequent ones can be defined by specifying the edge displacements. Moreover, the final edge is not explicitly necessary because the polygon is automatically closed before it is drawn.
Some polygons are easier to define by specifying vertices; others are more easily represented by edges. For many polygonal figures, however, it is even more convenient to express edges in terms of polar coordinates. This mode of specification is supported in the GPolygon class by the method addPolarEdge(r, theta), which is identical to addEdge(dx, dy) except that its arguments are the length of the edge (r) and its direction (theta) expressed in degrees counterclockwise from the +x axis. This method makes it easy to create figures such as the hexagon
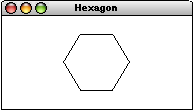 |
which can be generated using the following method, where side indicates the length of each edge:
|
The GPolygon class implements the GFillable and GScalable interfaces, but not GResizable. It also supports the method rotate(theta), which rotates the polygon theta degrees counterclockwise around its origin.
The GPolygon class is also useful as a base for new shape classes whose outlines are polygonal regions. This strategy is illustrated by the GStar class in Figure 2-15, which draws the following five-pointed star:
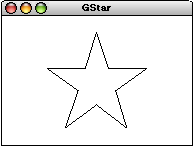 |
The only complicated part of the GStar definition is the geometry required to compute the coordinates of the starting point of the figure.
Figure 2-15. Class definition for a five-pointed star [applet using GStar]
/*
 * File: GStar.java
 * ----------------
 * This file illustrates the strategy of subclassing GPolygon by
 * creating a new GObject class depicting a five-pointed star.
 */

import acm.graphics.*;

/**
 * Defines a new GObject class that appears as a five-pointed star.
 */

public class GStar extends GPolygon {

/**
 * Creates a new GStar centered at the origin that fits inside
 * a square of the specified size.
 */
   public GStar(double size) {
      double sinTheta = GMath.sinDegrees(18);
      double b = 0.5 * sinTheta / (1.0 + sinTheta);
      double edge = (0.5 - b) * size;
      addVertex(-size / 2, -b * size);
      int angle = 0;
      for (int i = 0; i < 5; i++) {
         addPolarEdge(edge, angle);
         addPolarEdge(edge, angle + 72);
         angle -= 72;
      }
      markAsComplete();
   }

/**
 * Creates a new GStar centered at the point (x, y) that fits inside
 * a square of the specified size.
 */
   public GStar(double x, double y, double size) {
      this(size);
      setLocation(x, y);
   }
} |
The constructor for the GStar class ends with a call to the protected GPolygon method markAsComplete, which prohibits clients from adding more vertices to the polygon. This call protects the integrity of the class and makes it impossible for clients to change the shape of a GStar object into something else.
The shape classes described in Section 2.4 are the basic building blocks that allow you to build more complicated structures. In a sense, these classes represent the “atoms” of the acm.graphics world. Particular as diagrams become more complex, it is useful to assemble several atomic shapes into a “molecule” that you can then manipulate as a unit. In the acm.graphics package, this facility is provided by the GCompound class.
The methods defined in GCompound are in some sense the union of those available to the GObject and GCanvas classes. As a GObject, a GCompound responds to method calls like setLocation and move; as an implementer (like GCanvas) of the GContainer interface, it supports methods like add and remove. A summary of the important methods available for GCompound appears in Figure 2-16.
Figure 2-16. Important methods in the GCompound class (beyond those from GObject)
| ||||||||||||||||||||||||||
To get a sense of how the GCompound class works, it is easiest to start with a simple example. Imagine that you wanted to assemble the following face on the canvas:
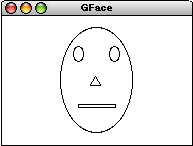 |
For the most part, this figure is easy to create. All you need to do is create a new GOval for the head, two
The code in Figure 2-17 uses GCompound to define a GFace class that contains the necessary components. These components are created and then added in the appropriate places as part of the GFace constructor. Once you have defined this class, you can then construct a new GFace object and add it to the center of the canvas using the following code:
|
Figure 2-17. Program to create a GFace class by extending GCompound [applet]
/*
 * File: GFace.java
 * ----------------
 * This file defines a compound GFace class.
 */

import acm.graphics.*;

/**
 * This code defines a new class called GFace, which is a compound
 * object consisting of an outline, two eyes, a nose, and a mouth.
 * The origin point for the face is the center of the figure.
 */
public class GFace extends GCompound {

/** Construct a new GFace object with the specified dimensions */
   public GFace(double width, double height) {
      head = new GOval(width, height);
      leftEye = new GOval(EYE_WIDTH * width, EYE_HEIGHT * height);
      rightEye = new GOval(EYE_WIDTH * width, EYE_HEIGHT * height);
      nose = createNose(NOSE_WIDTH * width, NOSE_HEIGHT * height);
      mouth = new GRect(MOUTH_WIDTH * width, MOUTH_HEIGHT * height);
      add(head, -width / 2, -height / 2);
      add(leftEye, -0.25 * width - EYE_WIDTH * width / 2,
                   -0.25 * height - EYE_HEIGHT * height / 2);
      add(rightEye, 0.25 * width - EYE_WIDTH * width / 2,
                    -0.25 * height - EYE_HEIGHT * height / 2);
      add(nose, 0, 0);
      add(mouth, -MOUTH_WIDTH * width / 2,
                 0.25 * height - MOUTH_HEIGHT * height / 2);
   }

/* Creates a triangle for the nose */
   private GPolygon createNose(double width, double height) {
      GPolygon poly = new GPolygon();
      poly.addVertex(0, -height / 2);
      poly.addVertex(width / 2, height / 2);
      poly.addVertex(-width / 2, height / 2);
      return poly;
   }

/* Constants specifying feature size as a fraction of the head size */
   private static final double EYE_WIDTH    = 0.15;
   private static final double EYE_HEIGHT   = 0.15;
   private static final double NOSE_WIDTH   = 0.15;
   private static final double NOSE_HEIGHT  = 0.10;
   private static final double MOUTH_WIDTH  = 0.50;
   private static final double MOUTH_HEIGHT = 0.03;

/* Private instance variables */
   private GOval head;
   private GOval leftEye, rightEye;
   private GPolygon nose;
   private GRect mouth;
} |
The general paradigm for using GCompound is to create an empty instance of the class and then to add other graphical objects to it. The coordinates at which these objects appear are expressed relative to the reference point of the GCompound itself, and not to the canvas in which the compound will eventually appear. This strategy means that you can add a compound object to a canvas and the move all its elements as a unit simply by setting the location of the compound. Thus, once you had created the GFace object described in the preceding section, you could move the entire face 20 pixels to the right by executing the following method:
|
In some cases—most notably when you need to translate the coordinates of a mouse click, which are expressed in the global coordinate space of the canvas—it is useful to be able to convert coordinates from the local coordinate space provided by the GCompound to the coordinate space of the enclosing canvas, and vice versa. These conversions are implemented by the methods getCanvasPoint and getLocalPoint, as described in Figure 2-16.
The fact that the GCompound class maintains its own coordinate system has an additional advantage that may not immediately spring to mind: it allows you to change the reference point for a single graphical object, usually to make the interpretation of that reference point more closely correspond to the way that object might behave in the real world. As an example, consider how you might represent a bouncing ball on the canvas. The obvious solution is to use a GOval with equal width and height so that it appears as a circle. The only problem with that strategy is that the reference point of a GOval is in the upper left corner. If you want to perform any physical calculations involving the ball, it would be far better if the location of the ball were defined to be its center.
The simplest way to accomplish this shift in the reference point from the corner to the center is to use the GCompound class. If you add a GOval with radius r so that its location in the coordinate system of the compound is at (–r, –r), then the GCompound will display itself on the canvas as a circle centered at the location of the GCompound object. The code in Figure 2-18 shows how to use this strategy to create a new GBall class whose location represents the center of the ball. You’ll have a chance to see this class in action in Chapter 3 which includes code to animate a GBall object so that it bounces around inside the boundaries of the canvas.
Figure 2-18. Using GCompound to create a ball defined by its center
/*
 * File: GBall.java
 * ----------------
 * This file defines a GObject class that represents a ball.
 */

import acm.graphics.*;

/**
 * This class defines a GObject subclass that represents a ball
 * whose reference point is the center rather than the upper
 * left corner.
 */
public class GBall extends GCompound {

/** Creates a new ball with radius r centered at the origin */
   public GBall(double r) {
      GOval ball = new GOval(2 * r, 2 * r);
      ball.setFilled(true);
      add(ball, -r, -r);
      markAsComplete();
   }

/** Creates a new ball with radius r centered at (x, y) */
   public GBall(double r, double x, double y) {
      this(r);
      setLocation(x, y);
   }

} |
The remaining two classes in the acm.graphics package are the GPen and GTurtle classes, which don’t really fit into the shape class framework. Their purpose is to provide students with a simple mechanism for drawing figures using a paradigm that is more aligned with the pen-on-paper model that the felt-board model used in the rest of the package.
The GPen class models a pen that remembers its current location on the GCanvas on which it is installed. The most important methods for GPen are setLocation (or move to specify relative motion) and drawLine. The former corresponds to picking up the pen and moving it to a new location; the latter represents motion with the pen against the canvas, thereby drawing a line. Each subsequent line begins where the last one ended, which makes it very easy to draw connected figures. The GPen object also remembers the path it has drawn, making it possible to redraw the path when repaint requests occur. The most important methods for the GPen class are shown in Figure 2-19.
Figure 2-19. Useful methods in the GPen class
| ||||||||||||||||||||||||||||||
The graphics model provided by the GPen class is particularly well suited for generating recursive figures, such as the Koch fractal or “snowflake” curve. In its simplest form, the Koch fractal is simply an equilateral triangle that looks like this:
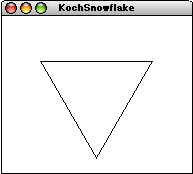 |
This figure is called the order 0 Koch fractal. To construct the Koch fractal of the next higher order, all you do is replace each of the lines in the current figure by a new line in which the center third is replace by a triangular wedge pointing to the outside of the figure. If you do this for each of the three line segments in the order 0 fractal, you get the order 1 fractal:
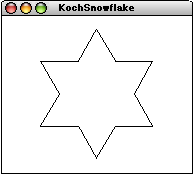 |
You can continue this process to obtain Koch fractals of successively higher orders. The order 3 Koch fractal, for example, looks like this:
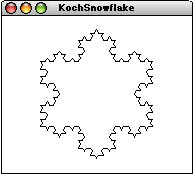 |
A recursive program to display a Koch fractal appears in Figure 2-20.
Figure 2-20. Using GPen to draw a Koch fractal snowflake [applet]
/*
 * File: KochSnowflake.java
 * ------------------------
 * This program demonstrates the use of the GPen class by drawing
 * a Koch fractal snowflake.
 */

import acm.program.*;
import acm.graphics.*;
import java.awt.*;

public class KochSnowflake extends GraphicsProgram {

/** Runs the program to create the snowflake display */
   public void run() {
      double width = getWidth();
      double height = getHeight();
      pen = new GPen();
      add(pen, width / 2, height / 2);
      drawKochFractal(EDGE_FRACTION * Math.min(width, height), ORDER);
   }

/*
 * Draws a snowflake fractal centered at the current pen position.
 * The edge parameter indicates the length of any of an edge on the
 * order 0 fractal, which is simply a triangle.  The order parameter
 * specifies the number of levels of recursive decomposition.
 */
   private void drawKochFractal(double edge, int order) {
      pen.move(-edge / 2, -edge / (2 * Math.sqrt(3)));
      drawFractalLine(edge, 0, order);
      drawFractalLine(edge, -120, order);
      drawFractalLine(edge, +120, order);
   }

/*
 * Draws a fractal line that extends r pixels in the direction theta.
 */
   private void drawFractalLine(double r, int theta, int order) {
      if (order == 0) {
         pen.drawPolarLine(r, theta);
      } else {
         drawFractalLine(r / 3, theta, order - 1);
         drawFractalLine(r / 3, theta + 60, order - 1);
         drawFractalLine(r / 3, theta - 60, order - 1);
         drawFractalLine(r / 3, theta, order - 1);
      }
   }

/* Private constants */
   private static final double EDGE_FRACTION = 0.75;
   private static final int ORDER = 3;

/* Private instance variables */
   private GPen pen;
} |
Both the GPen class and the GTurtle class described in the following section are often used to create animated displays. To provide clients with some control over the speed of the animation, both classes include a setSpeed method, which takes a number between 0.0 and 1.0 as its argument. Calling setSpeed(0.0) means that the animation crawls along at a very slow pace; calling setSpeed(1.0) makes it proceed as fast as the system allows. Intermediate values are interpreted so as to provide a smoothly varying speed of operation. Thus, if the speed value is associated with a scrollbar whose ends represent the values 0.0 and 1.0, adjusting the scrollbar will cause the animation to speed up or slow down in a way that seems reasonably natural to users.
The GTurtle class is similar to GPen but uses a “turtle graphics” model derived from the Project Logo turtle described in Seymour Papert’s book Mindstorms. In the turtle graphics world, the conceptual model is that of a turtle moving on a large piece of paper. A GTurtle object maintains its current location just as a GPen does, but also maintains a current direction.
The most common methods in the GTurtle class are shown in Figure 2-21. Of these, the ones that implement the essential semantics for GTurtle are forward(distance), which moves the turtle forward the specified distance, and the directional methods left(angle) and right(angle), which rotate the turtle the indicated number of degrees in the appropriate direction. The path is created by a pen located at the center of the turtle. If the pen is down, calls to forward generate a line; if the pen is up, such calls simply move the turtle without drawing a line.
Figure 2-21. Useful methods in the GTurtle class
| |||||||||||||||||||||||||||
Although GTurtle and GPen have similar capabilities, they are likely to be used in different ways. The GTurtle class is designed to be used at the very beginning of a course and must be both simple and evocative as intuitive model. The GTurtle therefore has somewhat different defaults than its GPen counterpart does. The image of the GTurtle, for example, is initially visible, while the GPen image is hidden. Moreover, the GTurtle does not actually draw lines until the pen is lowered. The GPen offers no option; the pen is always down. These defaults make the GTurtle consistent with the Logo model, in which students learn to move the turtle first and then start drawing pictures with it.
In order for students to get a good sense of how the acm.graphics model works, they need to see it in action. Although writing graphical programs is essential to gaining an understanding, there is a sense in which the resulting programs have lost some immediacy. Students need to understand that whenever they call a method in a graphical object—or, in the language of object-oriented programming, send it a message—that object will respond by repainting itself on the canvas. In a running application, those repaint requests are typically coalesced into a single operation, which makes it difficult to see how an object responds to the individual messages.
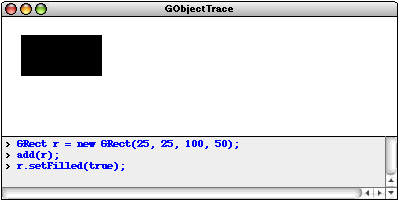
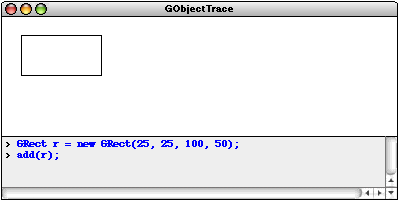
To make it easier for students to see precisely how graphical objects work and what effect each type of message has on that object, the demos section of the Java Task Force web site contains a program called GObjectTrace, which you can find at the following URL:
This applet brings up a program window that has a GCanvas in the upper portion and an interactive console along the bottom. This console is running a stripped-down version of a Java interpreter that includes definitions for the entire GObject hierarchy. By typing Java statements into this window, you can create arbitrary objects, add them to the canvas, and then send those objects messages that are immediately reflected in the canvas display.
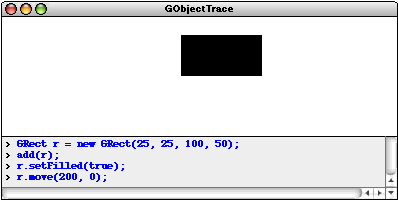
As an example, the three screen snapshots in Figure 2-22 show a series of steps in a GObjectTrace session. The line
|
allocates a new GRect object whose upper left corner is at the point (25, 25) and whose dimensions are 100 x 50. Nothing appears on the canvas, however, until the user calls
|
at which point an unfilled rectangle appears. The next two lines of input show what happens if you send messages—in this case, setFilled and move—to the object, which responds as shown in the display.
Figure 2-22. Using the GObjectTrace application [applet]
|

|
JTF Tutorial—July 31, 2006 |

|